
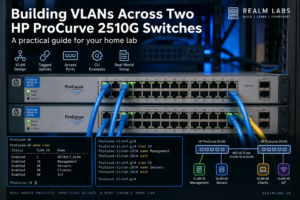

One of the most useful upgrades I made to the Realm Labs network was not buying another switch. It was finally using the managed switches I already had properly.
The two HP ProCurve 2510G switches had more than enough capability for a home lab: Gigabit Ethernet, VLAN support, a proper CLI and the ability to carry multiple networks across one inter-switch link. The challenge was turning that into a design that was easy to understand, easy to troubleshoot and did not accidentally cut off half the lab.
This article is a follow-on from my HP ProCurve 2510G setup guide and the wider Realm Labs home network design. Rather than covering initial switch access again, this focuses on how VLANs fit across two physical switches and what actually matters when you start tagging traffic.
Hardware used in this build
The main hardware here is the HP ProCurve 2510G. I used two of them because they are managed Gigabit switches with proper 802.1Q VLAN support and a CLI that makes the configuration easy to inspect and repeat.
- 2 × HP ProCurve 2510G managed switches — the actual switches used for the VLAN lab.
- Gigabit Ethernet uplink between the two switches carrying the tagged VLANs.
- TP-Link Deco X55 elsewhere in the Realm Labs network for Wi-Fi and routing duties.
The 2510G itself is older hardware and is generally easiest to find used. On my Realm Labs hardware page I list the newer HP 2530-24G as the closest current equivalent. View the current equivalent on Amazon.
Why segment the network at all?
For a long time it is perfectly possible to run a home lab as one large flat network. Everything can see everything else, devices are easy to discover and troubleshooting is simple because there is only one subnet to think about.
The downside appears as the environment grows. Servers, hypervisors, IoT hardware, smart-home devices, workstations and management interfaces all end up sharing the same broadcast domain and the same trust boundary.
I wanted to move toward a more deliberate layout where infrastructure could be grouped logically instead of every Ethernet port effectively belonging to the same network.
The goals were straightforward:
- Keep normal client traffic separate from infrastructure where useful.
- Create a cleaner home for IoT and automation devices.
- Keep switch and infrastructure management predictable.
- Carry multiple VLANs between the two ProCurve switches without needing separate cables for each network.
- Avoid breaking devices that should remain simple untagged Ethernet clients.
The important concept: tagged vs untagged
The terminology is where VLANs often feel more complicated than they really are.
On an HP ProCurve, a port can be an untagged member of a VLAN, a tagged member of one or more VLANs, or not a member of that VLAN at all.
For a normal device such as a PC, printer or Raspberry Pi, the port is usually untagged in exactly one VLAN. The connected device does not need to know VLANs exist. It sends ordinary Ethernet frames and the switch associates that traffic with the configured VLAN.
A link between managed switches is different. That single cable may need to transport several VLANs. Those VLANs are therefore carried as tagged traffic across the uplink.
This distinction is the core of the whole design:
- Access/device ports: normally untagged in one VLAN.
- Inter-switch uplink: tagged in every VLAN that needs to exist on both switches.
The two-switch layout
Realm Labs uses managed switching in more than one physical location, so I needed the same logical networks to be available on both switches.
The topology is conceptually simple:
Router / Layer-3 Gateway
        |
        |
   HP ProCurve 2510G
        |
        |  tagged VLAN uplink
        |
   HP ProCurve 2510G
        |
   local access ports
The exact physical port numbers are less important than the principle. One port on each switch becomes the inter-switch link. Any VLAN that must cross between switches is tagged on both ends of that link.
If a VLAN exists on Switch A but is not tagged on the uplink, devices on Switch B will never see that VLAN no matter how correct the access-port configuration looks.
Planning the VLANs before touching the switches
I find it much easier to decide the logical groups first and only then translate them into switch configuration.
A simple home-lab design might look like this:
| Purpose | Example VLAN | Typical devices |
|---|---|---|
| Main LAN | 10 | PCs, laptops, normal clients |
| Infrastructure / Management | 20 | Switch management, hypervisors, admin interfaces |
| IoT / Automation | 30 | ESP32, smart-home hardware, controllers |
| Lab / Testing | 40 | Temporary VMs, test devices, experimental systems |
Those VLAN numbers are examples rather than a claim that these were the exact IDs used everywhere in Realm Labs. The useful part is deciding what belongs together and why.
Creating a VLAN on the ProCurve
The ProCurve CLI is pleasantly direct once you understand its vocabulary.
A basic VLAN definition follows this pattern:
configure terminal
vlan 30
   name "IoT"
   exit
write memory
This creates the VLAN, but it does not yet decide which ports belong to it.
That separation is useful because VLAN creation and VLAN membership are two different jobs. A switch can know about VLAN 30 without any device actually being connected to it yet.
Useful HP ProCurve CLI examples
Most of the work on the 2510G can be done quickly from the CLI. These are the sorts of commands I use when building or checking VLANs. The VLAN IDs and port numbers below are examples, so they can be adapted to suit the actual network.
Create and name a VLAN
configure terminal
vlan 20
   name "IOT"
   exit
write memory
This creates VLAN 20, gives it a readable name and saves the configuration.
Put an access port into a VLAN
configure terminal
vlan 20
   untagged 8
   exit
write memory
Port 8 now behaves like a normal access port for VLAN 20. A PC, Raspberry Pi or other ordinary Ethernet device plugged into that port does not need to understand VLAN tagging.
Carry the VLAN across the inter-switch link
configure terminal
vlan 20
   tagged 24
   exit
write memory
The corresponding uplink port on the second switch needs the same VLAN tagged as well.
Check the configuration
show vlan
show vlan 20
show mac-address
show vlan gives a quick overview of VLAN membership, show vlan 20 narrows the view to one VLAN, and show mac-address is useful for confirming that the switch is actually learning devices on the ports you expect.
Assigning an ordinary device port
For a device that does not understand VLAN tagging, its switch port should be untagged in the desired VLAN.
For example:
vlan 30
   untagged 8
   exit
From the connected device’s point of view, nothing unusual is happening. It still sees an ordinary Ethernet connection.
The important trap is that a ProCurve port is normally already an untagged member of another VLAN, commonly the default VLAN. Moving it into a new VLAN therefore means making sure its old untagged membership is removed or changed appropriately.
Tagging the inter-switch uplink
The uplink is where most of the design comes together.
If port 24 is the cable between the two switches, and VLANs 20, 30 and 40 must exist on both sides, the conceptual configuration is:
vlan 20
   tagged 24
   exit

vlan 30
   tagged 24
   exit

vlan 40
   tagged 24
   exit
The same VLANs must be tagged on the corresponding uplink port at the other switch.
This sounds obvious when written down, but it is one of the easiest mistakes to make. Configuring one end correctly does not magically configure the other end. VLAN membership has to make sense on both switches.
Why one missing tag can look like a routing problem
One of the confusing things about VLAN troubleshooting is that a Layer-2 problem can easily look like a DHCP, firewall or routing problem.
A device might:
- fail to get a DHCP address,
- receive no gateway,
- work on one switch but not the other,
- or only communicate with devices connected locally.
It is tempting to jump straight to the router or firewall.
Before doing that, I check the entire Layer-2 path:
- Is the endpoint port untagged in the intended VLAN?
- Does that VLAN exist on the local switch?
- Is the VLAN tagged on the inter-switch uplink?
- Is it tagged on the uplink at the other end?
- Does the VLAN reach the device performing routing or DHCP?
If any one of those is missing, higher-level services never get the chance to work.
Management traffic deserves extra care
Moving switch management onto a dedicated VLAN is useful, but it is also a very easy way to lock yourself out remotely.
I treat management changes differently from ordinary access-port changes. Before moving the management IP or changing the VLAN used to reach the switch, I want to know that the new path already works end to end.
That means checking:
- the management VLAN exists on both switches,
- the uplink carries it,
- the router has an interface for it if routing is required,
- my admin workstation can actually reach that subnet,
- and I still have console access if I get it wrong.
This is one of the reasons I still value proper managed switches with a serial console. A bad VLAN change is much less dramatic when there is a guaranteed local recovery path.
VLANs do not provide routing by themselves
Another important distinction is that the HP ProCurve 2510G is primarily handling the Layer-2 separation here.
Creating VLANs stops those broadcast domains being one flat network, but it does not automatically decide which VLANs may talk to each other.
Inter-VLAN routing belongs at the router or another Layer-3 device. That is also where firewall rules can decide, for example, that IoT devices may reach Home Assistant but should not have unrestricted access to management systems.
The switches create the lanes. The router decides where traffic is allowed to change lanes.
How this fits the wider Realm Labs network
The VLAN work makes more sense as part of the wider network rather than as an isolated switch experiment.
The Realm Labs network design already includes structured Ethernet, mesh Wi-Fi and a growing set of servers and smart-home devices. As the number of services increased, logical separation became much more useful than simply adding more ports.
It also complements projects such as Home Assistant, Synology storage, and the Proxmox infrastructure. Those systems do not all need to sit in exactly the same trust zone just because they share the same physical switches.
What went wrong most often
The errors were rarely complicated commands. They were mismatches.
The most common failure patterns were:
- the VLAN existed on one switch but not the other,
- the VLAN existed on both switches but was missing from the uplink,
- an endpoint port was still untagged in the wrong VLAN,
- management was moved before the new management path was proven,
- or routing/DHCP was blamed before the Layer-2 path had been checked.
That is why I now work outward from the device one hop at a time instead of looking at the whole network at once.
Useful verification commands
On the ProCurve, the exact commands available can vary slightly by software version, but these are the kinds of checks I use:
show vlans
show vlan 30
show interfaces brief
show mac-address
I am looking for evidence rather than assumptions: is the port actually in the VLAN I think it is, is the uplink actually tagged, and is the switch learning the expected MAC addresses?
Why I kept the old ProCurves
The 2510G is old hardware, but for this job that does not matter much.
I do not need a modern cloud-managed interface to learn or use basic VLAN design. The switches are stable, have a proper CLI, support the features I need and make the underlying networking concepts very visible.
That is valuable in a home lab. When something breaks, there is less abstraction between the configuration and what the switch is actually doing.
What I would do differently now
If I were designing the segmentation from scratch today, I would document the VLAN matrix before configuring anything: VLAN ID, purpose, subnet, gateway, DHCP source, tagged uplinks and which access ports belong to it.
I would also keep management conservative. A dedicated management VLAN is useful, but only after the rest of the switching and routing path is proven.
Most importantly, I would avoid changing several layers at once. Configure the VLAN, verify Layer 2, then add DHCP/routing, then apply firewall policy. That makes it much easier to know which change actually caused a failure.
Final thoughts
VLANs were one of those upgrades that made the Realm Labs network feel less like a collection of connected devices and more like deliberate infrastructure.
The HP ProCurve 2510G switches did not need replacing to make that happen. They simply needed to be used as managed switches rather than expensive unmanaged ones.
The biggest lesson was not any particular command. It was understanding the path: an endpoint enters a VLAN untagged, the VLAN crosses switch-to-switch links tagged, and routing happens somewhere else entirely.
Once that mental model is clear, troubleshooting becomes much less mysterious.