

I have rebuilt enough PCs over the years to know how quickly a collection of USB sticks turns into a mess. One contains a Windows installer, another has recovery tools, another is out of date, and the one you actually need is usually the one you cannot find.
That was the starting point for this project: could I turn part of the RealmLabs network into a reusable Windows deployment environment?
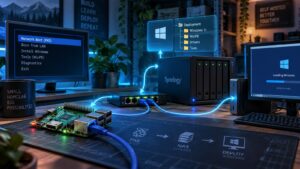
The idea was not to build a full enterprise deployment platform. I wanted something appropriate for a home lab: a small Raspberry Pi handling the lightweight network-boot side, my Synology NAS storing the larger Windows and WinPE files, and any compatible PC on the LAN being able to boot into a deployment or recovery environment without a USB stick.
Like quite a few RealmLabs projects, the final design was shaped as much by what went wrong as by the original plan. TFTP, DHCP behaviour, port 69 conflicts, UEFI booting and later experiments with tools such as netboot.xyz and iVentoy all changed how I thought about the job.
What I wanted the PXE setup to do
The basic requirement was simple. A machine should be able to start from its network adapter, receive enough information to locate a boot server, load a small boot environment and then access the larger deployment files stored elsewhere.
In practical terms, I wanted a flow that looked something like this:
- The target PC starts with Network Boot / PXE selected in its firmware.
- DHCP gives the machine its normal network configuration and tells it where the boot service lives.
- The Raspberry Pi provides the initial PXE/TFTP or menu service.
- A lightweight environment such as WinPE starts.
- WinPE then accesses Windows installation files, drivers or tools held on the Synology NAS.
That separation was important. A Raspberry Pi is perfectly capable of serving small boot files, but there was little point filling its SD card with Windows ISOs and deployment payloads when I already had centralised storage available on the network.
It also fitted the way RealmLabs was already structured. The Synology had become the storage backbone of the lab, which I covered separately in Building the Storage Backbone of Realm Labs, while Raspberry Pis were already being used for lightweight infrastructure and automation tasks.
The architecture: Pi for boot, NAS for storage
I deliberately split the project into two roles.
Raspberry Pi
The Pi’s job was to provide the small, always-on network services needed to get a client machine into a boot environment. Depending on the version of the project I was testing, this meant TFTP/PXE components directly on Linux or a containerised tool presenting a network-boot menu.
The Pi was a good fit because it is low power, silent and can sit on the network permanently. I already had a repeatable way of building Pis for the lab, including SSH and network configuration, documented in Installing Raspberry Pi OS and Enabling SSH for a Homelab.
Synology NAS
The NAS held the files that were too large or too valuable to scatter across SD cards:
- Windows installation media
- extracted Windows setup files
- WinPE images
- drivers
- recovery utilities
- deployment scripts and supporting tools
This also meant I could update one central copy rather than replacing files on several boot devices.
The approach is similar to the wider RealmLabs design: use small devices for specialised services and keep persistent data on central storage wherever it makes sense.
Why WinPE mattered
PXE itself only solves the first part of the problem. Getting a machine to download a boot file is useful, but my real goal was to get into an environment that could actually install or repair Windows.
That is where Windows Preinstallation Environment (WinPE) came in.
WinPE is effectively a minimal Windows environment designed for installation, deployment and recovery. Once WinPE is running, the problem changes from “how do I network boot this machine?” to the much easier question of “how do I reach my deployment share?”
My intended layout was therefore:
Client PC
   |
   | PXE / network boot
   v
Raspberry Pi
   |
   | small boot files / WinPE loader
   v
WinPE
   |
   | SMB / network access
   v
Synology NAS
   |
   +-- Windows 11
   +-- WinPE
   +-- Drivers
   +-- Recovery Tools
   +-- Scripts
Once WinPE has network connectivity, the NAS can be mapped in the same way as any other network share and Windows Setup can be started from there.
Preparing the Synology deployment share
The NAS side of the project was deliberately boring, which is exactly what I wanted.
I created a dedicated location for deployment material and kept the folder structure predictable. A simple structure is easier to maintain than burying files in a giant software share:
Deployment/
├── Windows/
│   ├── Windows-11/
│   └── Archive/
├── WinPE/
├── Drivers/
│   ├── Network/
│   └── Storage/
├── Tools/
└── Scripts/
The important point is that the PXE server does not need to be the long-term home of those files. It only needs to get the machine far enough into the process that normal network storage becomes available.
This proved particularly useful because the Synology was already integrated into other parts of the lab. It reduced duplication and made backups far easier than treating the Pi’s SD card as permanent storage.
The awkward part: DHCP and PXE
This was where the project stopped being a simple “install a package and boot a PC” exercise.
A PXE client normally needs more than an IP address. It needs to discover where the network boot server is and which initial file it should request. On a traditional network, a DHCP server can supply those PXE-specific options.
The problem in a home network is that DHCP is often already being handled by the router or another device. I did not want to casually replace the existing DHCP service just to make PXE work.
Running two normal DHCP servers on the same network is also a very good way to create confusing problems.
So one of the design questions became:
How can the existing network continue to provide normal DHCP while the Raspberry Pi only supplies the information needed for PXE?
Depending on the tool, this can be handled using proxy-DHCP or by configuring the existing DHCP server with the appropriate boot-server information. The exact answer depends heavily on what is providing DHCP in a particular network.
This is also why I would not recommend blindly copying someone else’s PXE configuration. The boot server may be identical, but the DHCP side can be completely different.
My broader home-network layout is documented in Building the Realm Labs Home Network, and PXE was another good example of why knowing which device owns DHCP, DNS and routing matters before adding another infrastructure service.
Then port 69 got involved
TFTP traditionally uses UDP port 69, and during the project I hit exactly the kind of problem that makes self-hosting interesting: something wanted the port that the PXE/TFTP service needed.
The symptom can be deceptively simple. The container or daemon appears to start incorrectly, PXE clients fail to retrieve their first file, or the service reports that it cannot bind to UDP 69.
Before changing PXE settings, the useful question is:
Is something else already listening on UDP port 69?
On Linux, tools such as ss can identify listeners:
sudo ss -lunp | grep ':69'
If a TFTP service already owns the port, starting another container that expects to publish the same port will fail. That sounds obvious when written down, but it is easy to overlook when you are focused on boot menus, DHCP options and file paths.
It became one of the main lessons from the project: check the underlying network service before debugging the thing sitting on top of it.
Trying containers and netboot tools
As the project evolved I also experimented with making the PXE front end easier to manage using existing boot-menu projects rather than manually maintaining every entry.
Tools such as netboot.xyz are attractive because they can provide a much richer menu of bootable utilities and operating-system installers. I also experimented with iVentoy because the idea of presenting ISO-based boot choices over the network is extremely appealing for a lab.
Containerising these services also fitted naturally with the rest of RealmLabs. I already use Docker and Portainer extensively, including on Raspberry Pi; the basic setup is covered in Installing Docker and Portainer on Raspberry Pi for a Homelab.
But PXE is one of those workloads where containerisation does not magically remove the networking complexity. A container still has to interact with DHCP/TFTP traffic correctly, still needs the relevant ports, and may need host networking or carefully considered mappings.
That makes PXE a good example of an important Docker lesson: a container can simplify application management without simplifying the protocol the application relies on.
BIOS PXE and UEFI PXE are not quite the same problem
Another detail that matters more now than it once did is firmware type.
Older PXE guides often assume a legacy BIOS client. Most modern Windows machines are UEFI systems, and the boot file expected by a UEFI client is different from the one used by an old BIOS client.
Secure Boot can complicate the picture further because not every boot loader is signed in a way that every machine will accept.
That means a setup can appear to work perfectly on one test PC and fail immediately on another without anything being wrong with the physical network.
When troubleshooting, I found it useful to separate the process into stages:
- Did the client receive an IP address?
- Did it discover the PXE server?
- Did it request the initial boot file?
- Did TFTP actually deliver that file?
- Did the boot loader start?
- Did WinPE get network connectivity?
- Could WinPE reach the NAS share?
Treating “PXE does not work” as seven smaller questions makes debugging dramatically easier.
Why I still prefer the split-server design
After experimenting with several approaches, I still like the underlying architecture of this project.
I could put everything on one machine. A small server could provide DHCP, TFTP, HTTP, SMB and all of the installation files.
But for RealmLabs, that would actually make the design less useful.
The Raspberry Pi is disposable infrastructure. If its SD card dies, I can rebuild the service. The deployment media and scripts live on the NAS, where they belong.
The NAS is persistent storage. It does not need to become a PXE appliance just because it holds the files.
Keeping those roles separate also means I can change the front end later. I can replace a hand-built TFTP setup with netboot.xyz, iVentoy or something else without reorganising the entire deployment library.
Where Active Directory fits in
Network deployment also becomes more interesting once the machine being installed is destined for a domain environment.
RealmLabs already has an Active Directory-style home domain, documented in Building a Home Domain with Active Directory. That opens the door to taking this project beyond simply launching Windows Setup.
A future deployment workflow could potentially:
- apply a standard Windows edition and configuration
- install network/storage drivers
- run post-install PowerShell scripts
- set a predictable computer name
- join the RealmLabs domain
- allow Group Policy to take over application and user configuration
That last part is particularly useful because I already use Group Policy for several pieces of workstation configuration. The deployment system does not need to do everything itself; it only needs to deliver a clean machine to the point where the rest of the infrastructure can take over.
What I would change if I rebuilt it today
If I started the PXE project again from scratch, I would keep the same broad architecture but make the responsibilities even clearer.
1. Keep the existing DHCP service authoritative
I would avoid replacing working network DHCP purely for PXE. Where possible, I would use supported PXE options or a proxy-DHCP arrangement.
2. Keep large payloads off the Pi
The Pi should serve boot logic, not become another storage silo. Windows images, drivers and tools would continue to live on the NAS.
3. Design for UEFI first
Legacy BIOS support is useful for old hardware, but modern UEFI clients would be the primary target.
4. Treat TFTP as the bootstrap mechanism, not the transport for everything
TFTP is simple and useful for initial boot files. Once a richer environment is running, faster and more manageable protocols should carry the larger files.
5. Build the deployment share like something I will maintain
Clear folders, versioned Windows media, archived superseded images and separate driver directories make later changes far easier.
6. Document every dependency
DHCP owner, TFTP port, boot filenames, NAS paths and credentials are exactly the details that are obvious while building the system and completely forgettable six months later.
Was it worth doing?
Yes — even though PXE turned out to be considerably more involved than plugging in a USB installer.
The value of the project was not just avoiding USB sticks. It created a reusable point on the network where recovery tools, Windows deployment and future automation could all begin.
It also tied together several parts of the lab that had previously been separate: Raspberry Pi infrastructure, Synology storage, Docker, Windows, networking and eventually Active Directory.
Most importantly, it was another example of the design approach I keep coming back to with RealmLabs: small services doing one job well, backed by central storage and connected through the network.
The next logical step is to turn the Windows side into a more repeatable deployment workflow — not simply booting WinPE, but using it to take a blank machine all the way through Windows installation and into the domain with as little manual intervention as possible.