
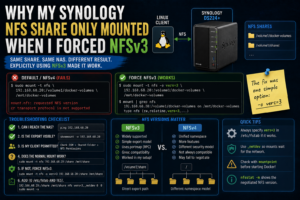

One of the more frustrating storage problems I hit in Realm Labs looked like a permissions issue at first.
The Synology NAS was online.
The NFS share existed.
The client could reach the NAS.
The export configuration looked right.
But the mount still failed.
Eventually, the fix was surprisingly simple:
Force NFS version 3.
Once I explicitly mounted the share using NFSv3, it worked.
That made this a useful reminder that “NFS is NFS” isn’t always true in practice. Version negotiation, client defaults and NAS behaviour can all get in the way.
The Setup
The storage side of Realm Labs is built around a Synology DS224+.
Several Linux systems use it for shared storage, including:
- Raspberry Pi
- Proxmox
- Docker hosts
- General Linux clients
The basic arrangement is:
Linux Client
    |
    v
NFS
    |
    v
Synology DS224+
The share itself had already been configured on the Synology.
So in theory, mounting it should have been as simple as:
sudo mount 192.168.68.20:/volume1/share /mnt/share
Instead, the mount refused to cooperate.
First Check: Is the NAS Reachable?
Before blaming NFS, I checked the obvious.
ping 192.168.68.20
The NAS responded.
That immediately ruled out:
- Bad IP address
- Basic routing failure
- Dead network interface
- NAS being offline
So the network path itself was fine.
Check the Export
The next step was verifying that the client could actually see the exported NFS shares.
A useful command is:
showmount -e 192.168.68.20
This asks the NFS server which exports it is publishing.
A healthy response might look something like:
Export list for 192.168.68.20:

/volume1/docker-volumes 192.168.68.0/22
/volume1/shared         192.168.68.0/22
If the export doesn’t appear here, the issue is probably on the Synology side.
In my case, the export existed.
So again, the configuration looked valid.
The Mount Still Failed
Trying the normal mount command still didn’t work reliably.
For example:
sudo mount -t nfs \
  192.168.68.20:/volume1/docker-volumes \
  /mnt/docker-volumes
Depending on the client, you may see errors around:
Protocol not supported
or:
mount.nfs: requested NFS version or transport protocol is not supported
or simply an unhelpful mount failure.
At this point, the problem starts to look much more complicated than it really is.
NFS Has Multiple Versions
The important thing to remember is that NFS has several protocol generations.
The ones you’re most likely to encounter are:
NFSv3
NFSv4
NFSv4.1
They are not identical.
There are differences around:
- Mount behaviour
- Authentication
- File locking
- Namespace layout
- Permissions
- Server configuration
- Client support
Modern Linux clients often prefer a newer NFS version automatically.
That usually works.
Until it doesn’t.
The Working Mount
The breakthrough was forcing the client to use NFSv3 explicitly.
For example:
sudo mount -t nfs \
  -o vers=3 \
  192.168.68.20:/volume1/docker-volumes \
  /mnt/docker-volumes
This time, it mounted.
That was the entire difference.
No new share.
No firewall changes.
No NAS restart.
Just:
vers=3
Confirming the Mount
Afterwards:
mount | grep nfs
showed the share correctly.
You can also use:
df -h
to confirm the storage is mounted where expected.
A more detailed check:
nfsstat -m
can show the negotiated NFS version and mount options.
You should see something indicating version 3.
Why Did NFSv3 Work?
The short answer is compatibility.
The client and Synology were able to agree on NFSv3 cleanly.
The default or newer negotiation path was not behaving properly in that particular configuration.
The useful mental model is:
Client says:
"Let's use the newest version."

Server / network / export says:
"Not quite."

Mount fails.
Then:
Client says:
"Use NFSv3."

Server says:
"Fine."

Mount succeeds.
Sometimes being explicit is better than letting the systems negotiate.
NFSv4 Uses a Different Model
One reason NFSv4 can behave differently is that it presents exports through a more unified namespace.
With NFSv3, you commonly mount a direct path such as:
192.168.68.20:/volume1/docker-volumes
With NFSv4, the visible export path can depend on how the NAS exposes its NFSv4 root.
That can lead to situations where a path that is correct for v3 isn’t treated identically under v4.
This is especially confusing because the error doesn’t always clearly say:
You are using the wrong NFS version.
Synology NFS Settings Matter Too
DSM provides several NFS-related options for shared folders.
These include:
- Allowed client IP or subnet
- Read/write permissions
- Squash behaviour
- Security mode
- Asynchronous writes
If the client isn’t permitted, forcing v3 won’t magically fix that.
So the first checks should still be:
Is the client allowed?
Is the share exported?
Is the NAS reachable?
Only once those are correct does version troubleshooting make sense.
Check the Client Subnet
In my network, most systems sit inside:
192.168.68.0/22
The Synology NFS rule therefore needs to allow the relevant client address or subnet.
For example:
192.168.68.0/22
If only one old client IP is permitted, a newly addressed machine may fail even though NFS itself is fine.
This Came Up During the NAS IP Move
The issue became particularly relevant while moving the Synology from its older address to:
192.168.68.20
Changing a core storage server’s IP exposes all sorts of hidden dependencies.
Clients may still have:
- Old
/etc/fstabentries - Cached mounts
- Old DNS entries
- Docker bind paths
- Proxmox storage references
Once the IP was corrected, NFS version compatibility became another piece of the puzzle.
Updating /etc/fstab
Once I knew NFSv3 worked, I didn’t want to manually specify it after every reboot.
So the mount option belongs in /etc/fstab.
For example:
192.168.68.20:/volume1/docker-volumes /mnt/docker-volumes nfs vers=3,_netdev 0 0
The important part is:
vers=3
I also like:
_netdev
because it tells the system this filesystem depends on networking.
That helps avoid trying to mount the NAS before the network is ready.
Testing /etc/fstab
After editing:
sudo nano /etc/fstab
you don’t need to reboot immediately.
Instead:
sudo umount /mnt/docker-volumes
Then:
sudo mount -a
If no errors appear, check:
mount | grep docker-volumes
That is much safer than discovering a broken fstab entry during the next boot.
Use nofail Where Appropriate
For some non-critical mounts, adding:
nofail
can prevent a missing NAS from delaying or disrupting boot.
For example:
192.168.68.20:/volume1/docker-volumes /mnt/docker-volumes nfs vers=3,_netdev,nofail 0 0
Whether that is appropriate depends on what relies on the mount.
If Docker absolutely needs the storage before starting, silently continuing without it may actually be worse.
So this should be a deliberate choice.
Docker Makes Missing NFS Mounts Dangerous
This is an important point.
Imagine Docker expects:
/mnt/docker-volumes/nodered
to be an NFS-backed folder.
If the NFS mount fails, Linux may still have a perfectly normal local directory at:
/mnt/docker-volumes
Docker can then start writing data locally.
Now you have:
Expected:
Synology storage
but actually:
Local disk storage
That can be very confusing later.
So before starting containers that depend on NFS, I like to verify:
mountpoint /mnt/docker-volumes
A successful result confirms it is a real mounted filesystem.
mountpoint Is a Great Sanity Check
For example:
mountpoint /mnt/docker-volumes
If mounted:
/mnt/docker-volumes is a mountpoint
If not:
/mnt/docker-volumes is not a mountpoint
That one command can save a lot of confusion.
Check the Version with nfsstat
Once mounted:
nfsstat -m
might show something like:
/mnt/docker-volumes from 192.168.68.20:/volume1/docker-volumes

Flags:
rw,vers=3,...
That proves the client is actually using the version you expected.
Don’t Assume Newer Is Always Better
This was probably the biggest lesson.
There is a natural assumption that:
NFSv4 > NFSv3
because 4 is newer than 3.
And technically, NFSv4 has many improvements.
But the best protocol is the one that works reliably for the workload.
In a trusted home-lab LAN, an NFSv3 mount that is stable and predictable may be entirely appropriate.
The goal isn’t to win a protocol-version competition.
It’s to mount the storage reliably.
When I Would Prefer NFSv4
NFSv4 still has advantages.
I would consider it where I specifically wanted:
- Better stateful behaviour
- Modern locking
- More sophisticated identity handling
- A unified namespace
- Kerberos-backed authentication
- Features that depend on v4
But I wouldn’t force it purely because it is newer.
Useful Troubleshooting Commands
If an NFS mount is failing, these are the commands I reach for first.
Check the NAS
ping 192.168.68.20
Check exports
showmount -e 192.168.68.20
Try the normal mount
sudo mount -t nfs \
  192.168.68.20:/volume1/share \
  /mnt/share
Force NFSv3
sudo mount -t nfs \
  -o vers=3 \
  192.168.68.20:/volume1/share \
  /mnt/share
Check current mounts
mount | grep nfs
Confirm mountpoint
mountpoint /mnt/share
Show NFS options
nfsstat -m
Check the kernel log
dmesg | tail
or:
journalctl -xe
These usually give enough information to work out which layer is failing.
The Troubleshooting Order
The sequence I now use is:
1. Can I reach the NAS?
2. Is the export visible?
3. Is my client permitted?
4. Does the normal mount work?
5. If not, force vers=3.
6. Confirm the negotiated version.
7. Add the working options to fstab.
8. Test with mount -a.
That avoids jumping straight into permissions or rebuilding services.
The Failure Chain
What initially looked like:
Synology NFS is broken
was really closer to:
Client attempts default NFS version
        |
        v
Version / export behaviour doesn't line up
        |
        v
Mount fails
Then:
Client explicitly requests NFSv3
        |
        v
Synology accepts the mount
        |
        v
Storage works
The fix was tiny.
Understanding why it worked was the useful part.
The Realm Labs Takeaway
This is exactly the sort of issue that deserves a Lab Note because it is easy to lose an hour on it.
If:
- The NAS is reachable
- The export exists
- The permissions look right
- The mount still fails
try:
-o vers=3
before tearing the whole NFS configuration apart.
In my case:
sudo mount -t nfs \
  -o vers=3 \
  192.168.68.20:/volume1/docker-volumes \
  /mnt/docker-volumes
was the difference between a broken mount and a working one.
Sometimes the problem isn’t that NFS doesn’t work.
It’s that the client and server need you to be a little more specific.