

Every growing homelab reaches a point where remembering IP addresses, port numbers, and service URLs becomes a chore. While browser bookmarks work, having a central, live dashboard that displays service health, resource metrics, and instant links makes managing your environment effortless.
In this guide, we will walk through deploying Homepage using Portainer, mapping its configuration directory to a Synology NAS NFS share for quick file access, and setting up core features like service links (href), health checks, and system statistics.
Why Choose Homepage?
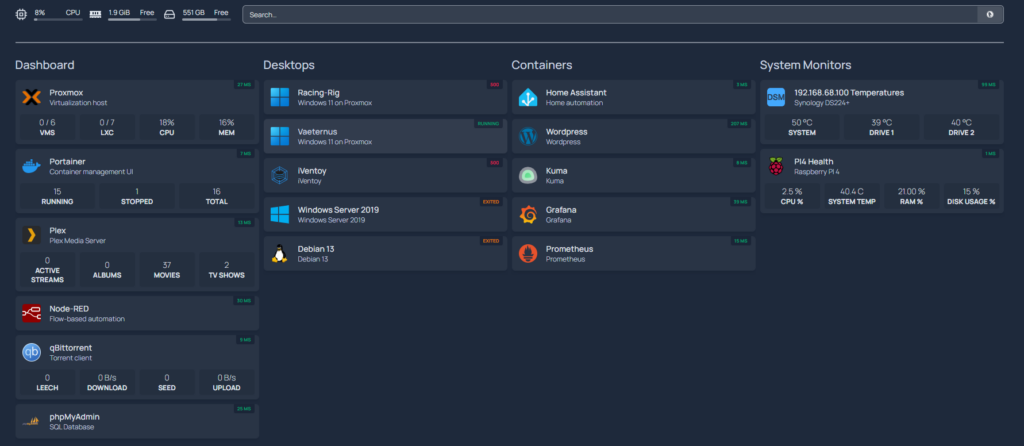
Homepage is a modern, fast, and highly customizable application dashboard. Key benefits include:
- YAML-Based Configuration: Easily back up, version control, or edit your layout directly on your storage host.
- Built-in Integrations: Supports over 100 native widgets (Docker, Portainer, Proxmox, Pi-hole, Home Assistant, and more).
- Docker Discovery: Automatically display and monitor containers via Docker sockets.
- Lightweight & Fast: Server-side rendered and privacy-focused—no key leaks or unnecessary cloud dependencies.
Step 1: Deploying via Portainer Stack
Using Portainer, you can deploy Homepage as a Docker Compose stack.
- Log in to your Portainer web interface.
- Navigate to Stacks – Add stack.
- Name your stack (e.g.,
homepage) and paste the following compose configuration:
YAML
version: "2.1"

services:
  homepage:
    image: ghcr.io/gethomepage/homepage:latest
    container_name: homepage
    environment:
      - HOMEPAGE_ALLOWED_HOSTS=* # Allows all hosts (adjust for reverse proxy security if needed)
    ports:
      - "4000:3000"  # Host port 4000 -> Container port 3000
    volumes:
      - /volume1/Sektor/nfs/docker-volumes/homepage:/app/config
      - /var/run/docker.sock:/var/run/docker.sock:ro  # Optional: For Docker auto-discovery
    restart: unless-stopped
Key Configuration Notes:
- Synology File Storage: Mapping
/volume1/Sektor/nfs/docker-volumes/homepageto/app/configensures all YAML files sit on your Synology NAS. You can easily modify them via Synology File Station, SMB share, or SSH. - Docker Socket: Mounting
/var/run/docker.sock:roin read-only mode allows Homepage to display live container statuses (Running / Stopped / Stats). - Port Mapping: The container runs on port
3000internally, mapped to host port4000(accessible athttp://<your-server-ip>:4000).
Click Deploy the stack.
Synology NFS Settings:
1. Enable the NFS Service on Synology
- Open Control Panel – File Services – NFS tab.
- Check Enable NFS service and select the appropriate protocol (typically NFSv3 or NFSv4 depending on your setup).
- Click Apply to activate the service.
2. Configure Shared Folder NFS Permissions
- Go to Control Panel – Shared Folder.
- Select your desired shared folder (e.g.,
docker-volumes) and click Edit. - Switch to the NFS Permissions tab and click Create.
- Configure the client rule:
- Hostname or IP: Enter the single IP address (e.g.,
192.168.1.50), IP range, or subnet mask (e.g.,192.168.1.0/24) of your target host. - Privilege: Set to Read/Write.
- Squash: Set user mapping based on your permission strategy (e.g., Map all users to admin or No mapping).
- Security: Keep as standard AUTH_SYS unless using Kerberos.
- Hostname or IP: Enter the single IP address (e.g.,
- Click OK to save the rule.
- Note: Note down the official mount path listed at the bottom-left of the NFS Permissions window (e.g.,
/volume1/docker-volumes).
3. Connect from the Client Side (Linux / Raspberry Pi Example)
- Install NFS Utilities: On Debian/Ubuntu/Raspberry Pi OS, run
sudo apt update && sudo apt install nfs-common. - Create a Local Mount Directory: Create a local target folder, e.g.,
sudo mkdir -p /mnt/synology-nfs. - Manual Test Mount: Mount the share using:Bash
sudo mount -t nfs <SYNOLOGY_IP>:/volume1/docker-volumes /mnt/synology-nfs - Automate via fstab (Optional): To make the mount persistent across reboots, add a line to
/etc/fstab:Plaintext<SYNOLOGY_IP>:/volume1/docker-volumes /mnt/synology-nfs nfs defaults 0 0
Step 2: Configuring Your Dashboard Files
Once Homepage starts for the first time, it populates default skeleton files in your Synology volume directory (/app/config). You can edit these files using your preferred editor or file browser.
1. Adding Services & Custom Links (services.yaml)
To organize your homelab links (href) and enable basic ping health checks (ping), open services.yaml:
YAML
- Infrastructure:
    - Portainer:
        icon: portainer.png
        href: http://192.168.1.100:9000
        description: Docker Container Management
        ping: http://192.168.1.100:9000

    - Synology NAS:
        icon: synology.png
        href: https://192.168.1.10:5001
        description: Central Storage & NFS Host
        ping: 192.168.1.10

- Home Automation:
    - Home Assistant:
        icon: home-assistant.png
        href: http://192.168.1.50:8123
        description: Smart Home Hub
        container: homeassistant
href: The target URL when clicking the card.ping: Monitors site/host availability and displays a green/red status indicator.container: Links the card to a running container via the Docker socket to show container health automatically.
(For a full list of supported icons and service options, check the Homepage Service Configuration Docs).
3. Enabling System Resource Stats & Temps (widgets.yaml)
Homepage can display real-time host metrics like CPU utilization, RAM usage, storage space, and system temperatures at the top of your dashboard.
Open widgets.yaml and configure system information widgets:
YAML
- resources:
    cpu: true
    memory: true
    disk: /

- openmeteo:
    label: Local Weather
    latitude: 51.35
    longitude: 1.41
    units: metric

- search:
    provider: duckduckgo
    target: _blank
If you wish to monitor specific host temperatures, CPU usage, or disk stats across multiple nodes, you can also integrate Glances or the Proxmox widget:
YAML
# Example Glances integration for temperature and detailed hardware metrics
- glances:
    url: http://192.168.1.100:61208
    version: 3
    metric: process
Step 4: Accessing Your Dashboard
Navigate to http://<YOUR-SERVER-IP>:4000 in your web browser. Homepage automatically hot-reloads changes whenever you edit and save any .yaml files on your Synology NAS share—no need to restart the container after every tweak!
Key Takeaways & Useful Links
- Official Website: Homepage Dashboard Portal
- Source Code: gethomepage/homepage on GitHub
- Widget Documentation: Homepage Service & Info Widgets
- Docker Container Management: Portainer Official Site