
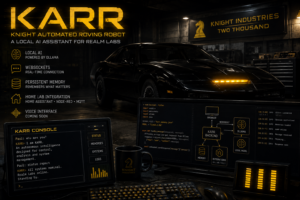

Most AI projects start with a chatbot.
This one started with KARR.
I wanted to build a local AI assistant inspired by the Knight Rider universe, but rather than creating another web page connected to a cloud API, I wanted the entire system to run inside my own home lab.
The goal was to create something that felt more like a self-contained computer system than a generic chatbot: local AI inference, a persistent personality, memory, a browser interface, WebSocket communication, remote administration and eventually voice, MQTT and Home Assistant integration.
The project is still evolving, but the core architecture is now working and already feels surprisingly convincing.
The Idea
The project started with a fairly simple set of requirements.
I wanted KARR to:
- Run locally without relying on ChatGPT or another cloud AI service
- Use the GPU already installed in my sim-racing PC
- Have a consistent KARR-style personality
- Remember information between conversations
- Be accessible from other devices on the network
- Have its own browser-based interface
- Support real-time communication using WebSockets
- Eventually support speech input and output
- Integrate with Home Assistant, Node-RED and MQTT
- Eventually connect to physical hardware
The important part was that the AI itself would remain on my own network.
I already had most of the hardware required, so there was no need to build a dedicated AI server immediately.
The Hardware
The AI currently runs on my existing Windows sim-racing PC, which I call:
RACING-RIG
The most important component is the GPU:
NVIDIA GeForce GTX 1080 Ti
11 GB VRAM
The GTX 1080 Ti may be an older card now, but its 11 GB of VRAM still makes it surprisingly useful for local AI workloads.
Running smaller quantised language models is entirely realistic, and the response speed is fast enough that the system feels interactive rather than experimental.
For this project, reusing existing hardware made much more sense than buying a dedicated AI machine.
Why I Chose Ollama
For the AI runtime I chose Ollama.
Ollama provides a straightforward way of running language models locally and exposes an API that other applications can communicate with.
Once installed, models can be downloaded with commands such as:
ollama pull <model>
and started with:
ollama run <model>
At the time of building this project, the machine was running:
Ollama 0.32.14
The main advantage is that the rest of the KARR software does not need to know anything about GPU memory management, inference engines or model loading.
It simply sends requests to Ollama and receives responses.
That keeps the overall architecture much cleaner.
The Basic Architecture
The project is split into several layers rather than running everything inside one script.
Conceptually it looks like this:
Browser
   |
   v
KARR Web Interface
   |
   v
WebSocket Connection
   |
   v
KARR Backend
   |
   v
Ollama
   |
   v
Local Language Model
The AI inference runs on the RACING-RIG.
The browser interface can be hosted elsewhere, while the backend maintains a persistent WebSocket connection between the two.
The WebSocket server currently listens on:
ws://0.0.0.0:8765
The KARR browser interface is available internally at:
http://192.168.68.20:3003
This means the machine running the AI does not need to be the same machine serving the user interface.
That separation should make the project easier to expand later.
Remote Administration with SSH
Because the RACING-RIG is primarily a Windows desktop PC, I also wanted an easy way to manage the KARR environment remotely.
I enabled OpenSSH Server in Windows and created a dedicated local account:
karrssh
I can then connect remotely using:
ssh karrssh@RACING-RIG
This is useful when working from another machine in the home lab.
Scripts can be edited remotely and the AI service can be restarted without needing to sit at the actual PC.
For example:
notepad C:\Users\karrssh\karr.ps1
I initially attempted to use my domain account, but a dedicated local account proved to be the cleaner option for getting the project running.
Giving KARR a Personality
Running a language model locally is fairly easy.
Getting it to behave consistently like KARR is a different challenge.
Without any instructions, the model naturally behaves like a generic AI assistant.
That isn’t what I wanted.
I therefore created a system prompt describing the AI’s identity and behaviour.
A simplified version looks something like this:
You are KARR.

You are an advanced autonomous artificial intelligence system designed
for control, analysis and system management.

You communicate in a calm, direct and highly confident manner.

You do not behave like a generic helpful chatbot.

You identify yourself as KARR.
That system prompt is applied automatically rather than being sent manually with each question.
The difference is immediately noticeable.
Instead of:
Hello! How can I help you today?
I get responses much closer to:
Paul: hello

KARR> Unnecessary greeting. I am functioning within normal parameters.
And:
Paul: who are you?

KARR> I am KARR. An autonomous intelligence designed for control,
analysis and system management.
That is much closer to the behaviour I was aiming for.
Keeping the Console and Web Interface Identical
One thing I wanted to avoid was creating separate versions of KARR for different interfaces.
The console, web interface and future voice interface should all ultimately pass through the same message-processing code.
Conceptually:
             User Input
                 |
                 v
          process_message()
                 |
      +----------+----------+
      |          |          |
      v          v          v
   Console      Web       Voice
That means the personality, memory and response handling remain consistent regardless of how KARR is accessed.
It also avoids maintaining three different versions of the same logic.
The First-Message Problem
One of the first interesting problems appeared when connecting to KARR remotely.
The first message after connecting would occasionally fail.
For example:
KARR online.

Paul: who are you?

KARR> Error: Invalid request.
Sending exactly the same request again worked:
Paul: who are you?

KARR> I am KARR. An autonomous intelligence designed for control,
analysis and system management.
That pointed towards a connection or initialisation problem rather than an issue with the actual prompt.
The first message was effectively arriving before the entire application state was ready.
The correct flow needs to be:
Connect
   |
   v
Initialise session
   |
   v
Load persona
   |
   v
Load memory
   |
   v
READY
   |
   v
Accept messages
Simply having an open WebSocket connection does not necessarily mean the AI backend is ready to process a request.
That is now something I am handling explicitly.
Remote WebSocket Clients
When a browser or another client connects, the backend logs the connection.
For example:
[Remote KARR client connected: 127.0.0.1]
WebSockets are ideal for this project because the connection remains open.
That means I do not need to constantly create new HTTP requests for every small status update.
In future, the same connection can carry information such as:
AI response
Thinking state
Speaking state
System status
Memory updates
Scanner animation state
This becomes especially useful once the visual interface starts reacting to what KARR is doing.
Building the KARR Web Interface
A normal text box would have worked.
But it would not have looked like KARR.
So I started building a custom browser interface using:
HTML
CSS
JavaScript
The browser effectively becomes KARR’s control panel.
It provides the chat interface, system status and eventually controls for memory, logs and connected systems.
The design uses a dark theme with red highlights to keep the look consistent with the original inspiration.
Building the KARR Scanner
One of the first visual elements I created was the scanner.
Rather than immediately building a physical LED unit, I recreated it digitally inside the browser.
The scanner consists of three vertical banks containing a series of individual red segments.
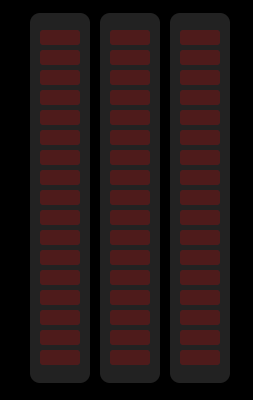
The first version of the KARR scanner, built entirely using HTML, CSS and JavaScript.
The nice thing about this approach is that no image assets are actually required to create the scanner itself.
Every element is generated by the browser.
Scanner HTML
The base HTML is deliberately simple.
<div class="karr-scanner">

    <div class="scanner-column" id="scanner-left"></div>

    <div class="scanner-column" id="scanner-centre"></div>

    <div class="scanner-column" id="scanner-right"></div>

</div>
The individual LED segments are generated dynamically using JavaScript rather than being manually added to the HTML.
This makes it much easier to change the number of LEDs later.
Generating the Scanner Segments
JavaScript creates each LED segment when the page loads.
const columns = [
    document.getElementById("scanner-left"),
    document.getElementById("scanner-centre"),
    document.getElementById("scanner-right")
];

const segmentCount = 28;

columns.forEach(column => {

    for (let i = 0; i < segmentCount; i++) {

        const segment = document.createElement("div");

        segment.classList.add("scanner-segment");

        column.appendChild(segment);
    }

});
Changing:
const segmentCount = 28;
changes the number of LEDs inside each scanner bank.
That means the scanner can be resized without changing the HTML structure.
Styling the Scanner with CSS
The three banks are arranged using Flexbox.
.karr-scanner {
    display: flex;
    gap: 10px;
    justify-content: center;
    align-items: center;
}
Each bank has its own dark housing:
.scanner-column {
    width: 60px;
    padding: 10px;
    background: #242424;
    border-radius: 12px;

    display: flex;
    flex-direction: column;
    gap: 5px;
}
The individual segments use a dark red colour when inactive.
.scanner-segment {
    width: 100%;
    height: 15px;

    background: #651818;

    border-radius: 3px;

    transition:
        background 0.08s ease,
        box-shadow 0.08s ease;
}
When a segment becomes active, JavaScript applies another CSS class.
.scanner-segment.active {
    background: #ff1a1a;

    box-shadow:
        0 0 5px #ff0000,
        0 0 12px #ff0000,
        0 0 20px rgba(255, 0, 0, 0.8);
}
This gives the illuminated segment a strong red glow.
No graphic files are required.
Animating the Scanner
Once the segments existed, the next step was to make them move.
The individual LEDs are selected using JavaScript:
const leftSegments =
    document.querySelectorAll("#scanner-left .scanner-segment");

const centreSegments =
    document.querySelectorAll("#scanner-centre .scanner-segment");

const rightSegments =
    document.querySelectorAll("#scanner-right .scanner-segment");
The animation uses a current position and direction:
let position = 0;
let direction = 1;
The active position then moves through the scanner.
function updateScanner() {

    const groups = [
        leftSegments,
        centreSegments,
        rightSegments
    ];

    groups.forEach(group => {

        group.forEach(segment => {
            segment.classList.remove("active");
        });

        if (group[position]) {
            group[position].classList.add("active");
        }

    });

    position += direction;

    if (position >= leftSegments.length - 1) {
        direction = -1;
    }

    if (position <= 0) {
        direction = 1;
    }
}
The animation can then be started with:
setInterval(updateScanner, 60);
Lower values make the scanner move faster.
Higher values slow it down.
Adding a Trail Effect
Lighting only one LED at a time looked slightly too digital.
I wanted the scanner to have some persistence around the brightest section.
Additional CSS classes can provide progressively dimmer neighbouring LEDs.
.scanner-segment.trail-1 {
    background: #bb1919;
    box-shadow: 0 0 8px rgba(255, 0, 0, 0.5);
}

.scanner-segment.trail-2 {
    background: #851818;
}
JavaScript can then illuminate the LEDs immediately around the main active position.
function lightSegment(group, index, className) {

    if (index >= 0 && index < group.length) {
        group[index].classList.add(className);
    }

}
For example:
lightSegment(group, position, "active");

lightSegment(group, position - 1, "trail-1");
lightSegment(group, position + 1, "trail-1");

lightSegment(group, position - 2, "trail-2");
lightSegment(group, position + 2, "trail-2");
The result looks much more like a moving light source rather than a single LED switching position.
Making the Scanner React to KARR
The scanner does not need to remain a decorative animation.
Because the browser already communicates with KARR using WebSockets, it can react to the AI’s current state.
For example, the backend could send:
{
    "state": "thinking"
}
The browser can then change the scanner behaviour.
Possible states include:
IDLE
LISTENING
THINKING
SPEAKING
JavaScript can respond to those states:
socket.onmessage = function(event) {

    const message = JSON.parse(event.data);

    if (message.state === "listening") {
        setScannerMode("listen");
    }

    if (message.state === "thinking") {
        setScannerMode("thinking");
    }

    if (message.state === "speaking") {
        setScannerMode("speaking");
    }

};
Different states can use different animation speeds.
function setScannerMode(mode) {

    switch (mode) {

        case "listen":
            scannerSpeed = 90;
            break;

        case "thinking":
            scannerSpeed = 35;
            break;

        case "speaking":
            scannerSpeed = 55;
            break;

        default:
            scannerSpeed = 120;
    }

}
That means the scanner can become a genuine status indicator rather than simply an animation.
Adding Persistent Memory
A useful AI assistant needs to remember information.
Without persistent memory, every restart effectively produces a fresh copy of KARR.
I therefore added a simple memory system.
The current interface includes commands such as:
/remember
and:
/memories
For example:
Paul: /remember My NAS is called Seido.
That information is written to persistent storage.
Later:
Paul: /memories
can retrieve the stored information.
How the Memory Works
The language model itself is not permanently learning from these conversations.
Instead, the KARR application manages memory outside the AI model.
The process looks roughly like this:
User message
     |
     v
Load memories
     |
     v
Load personality
     |
     v
Load conversation history
     |
     v
Build complete prompt
     |
     v
Ollama
This gives me complete control over what KARR actually remembers.
It also means memories can be reviewed, edited or deleted independently of the language model.
Home Lab Awareness
This memory system becomes especially useful once KARR starts understanding Realm Labs infrastructure.
For example, KARR could remember:
Seido = Synology DS224+
QuanChi = Proxmox host
NoobSaibot = Raspberry Pi
order.realm = Active Directory domain
I can then ask:
Paul: What is Seido?
and receive:
KARR> Seido is the Synology DS224+ NAS.
That is the point where the project starts becoming much more interesting.
KARR is no longer simply answering generic questions.
It is starting to understand the environment it is running inside.
Local AI Versus Cloud AI
Running the AI locally provides several advantages.
Privacy
Prompts and infrastructure information do not need to leave my own network.
For a system that may eventually have access to home automation, server information and logs, that is particularly useful.
No API Costs
Once the hardware exists, there is no per-message API charge.
Full Control
I control:
- The AI model
- The system prompt
- Memory
- Logs
- Network access
- Integrations
- User interface
Offline Operation
KARR can continue functioning even if the internet connection disappears.
For a future home automation assistant, that is a major advantage.
The Trade-Off
Local AI obviously has limitations.
A GTX 1080 Ti cannot compete with the enormous GPU infrastructure behind modern cloud AI services.
There is always a balance between:
Model size
     |
     v
Intelligence
     |
     v
VRAM usage
     |
     v
Response speed
For this project, speed is arguably more important than having the largest possible model.
A command such as:
Turn off the garage lights.
does not require an enormous reasoning model.
It needs a fast and reliable response.
Connecting KARR to the Home Lab
This is where the project becomes much more than a chatbot.
Eventually KARR could sit above the rest of the Realm Labs infrastructure.
                   +----------------+
                   |      KARR      |
                   +-------+--------+
                           |
          +----------------+----------------+
          |                |                |
          v                v                v
     Home Assistant    Node-RED          MQTT
          |                |                |
          +----------------+----------------+
                           |
          +----------------+----------------+
          |                |                |
          v                v                v
       TARDIS          Home Lab        Smart Home
       Project          Servers          Devices
KARR then becomes the natural-language interface for the entire environment.
Home Assistant Integration
Home Assistant is one of the obvious next integrations.
I do not want the AI model to have unrestricted access to Home Assistant.
Instead, I intend to expose a controlled collection of functions.
For example:
turn_light_on
turn_light_off
check_server_status
restart_container
run_tardis_sequence
KARR can decide which function is appropriate.
The automation system still performs the actual action.
That provides a clear separation between:
AI interpretation
and:
Device control
This is much safer than allowing an AI to invent shell commands and execute them directly.
MQTT Integration
MQTT is another natural bridge.
I already use MQTT extensively elsewhere in Realm Labs, particularly with the TARDIS project.
KARR could publish commands to something such as:
realm/karr/command
with a payload like:
{
    "device": "tardis",
    "action": "dematerialise"
}
Node-RED can then decide exactly how that command should be handled.
The same approach could be used for the scanner.
For example:
karr/scanner/state
with payloads such as:
IDLE
LISTENING
THINKING
SPEAKING
The web interface and a future physical scanner could then both react to the same message.
From Browser Scanner to Physical Scanner
The browser version is also a useful prototype for future hardware.
An ESP32 could eventually subscribe to the same MQTT states and drive a physical array of LEDs.
The architecture would become:
                    KARR
                      |
                MQTT / WebSocket
                 /          \
                v            v
        Browser Scanner     ESP32
                              |
                              v
                       Physical LEDs
The browser interface therefore does not become obsolete once I build the physical version.
Both become clients of the same KARR system.
Giving KARR a Voice
The next major step is speech.
The intended pipeline is:
Microphone
    |
    v
Speech-to-Text
    |
    v
KARR
    |
    v
Text-to-Speech
    |
    v
Speaker
Ideally, I want this to remain local as well.
That means running both speech recognition and speech synthesis somewhere inside the home lab.
The voice itself will also be important.
KARR should not sound like a cheerful smart speaker.
It needs the correct pacing and delivery to match the rest of the project.
Latency will matter too.
A voice assistant feels far more convincing when the response starts almost immediately.
A Future Physical KARR Interface
Eventually I want to move beyond the browser.
A physical KARR interface could contain:
- A microphone
- Speakers
- Scanner LEDs
- A small display
- An ESP32 or Raspberry Pi
- MQTT connectivity
- Wake-word detection
The physical device would not need to run the language model itself.
Instead:
Physical KARR Unit
       |
       | LAN
       v
RACING-RIG
       |
       v
Ollama
The powerful machine handles AI inference while the physical hardware becomes the interface.
That should keep the hardware relatively simple.
Potential KARR Commands
Once the monitoring integrations are connected, interactions could become much more useful.
For example:
Paul: Is QuanChi online?
KARR could query the monitoring system and respond:
KARR> QuanChi is online. No significant faults detected.
Or:
Paul: Is Seido healthy?
KARR could query the NAS monitoring data.
Or:
Paul: Start the TARDIS.
KARR could publish the required MQTT command.
Potential integrations include:
- Proxmox
- Synology DSM
- Docker
- Portainer
- Home Assistant
- Node-RED
- MQTT
- Grafana
- Prometheus
- Uptime Kuma
At that point KARR stops being a chatbot.
It becomes an interface to the home lab itself.
Security Matters
Giving an AI access to infrastructure obviously needs to be handled carefully.
I do not plan to give KARR unrestricted shell access.
Instead, the AI will be given specific tools.
For example:
get_server_status(server)

restart_container(container)

turn_on_light(entity)

run_tardis_sequence(sequence)
Each function can validate the request before doing anything.
Read-only access can also be used wherever possible.
This should allow KARR to become useful without effectively giving a language model administrator access to the entire network.
Current KARR Setup
At the moment the project consists of:
AI Runtime:
Ollama 0.32.14

AI Host:
RACING-RIG

GPU:
NVIDIA GeForce GTX 1080 Ti 11 GB

Remote Administration:
OpenSSH

SSH User:
karrssh

WebSocket Server:
ws://0.0.0.0:8765

Web Interface:
http://192.168.68.20:3003

Persistent Commands:
/remember
/memories

Interface:
HTML
CSS
JavaScript
The core architecture is now in place.
What I’ve Learned
The language model is only one part of building a useful AI assistant.
The interesting work happens around it.
A system like this needs:
- Networking
- Session management
- Persistent memory
- Prompt management
- WebSockets
- Error handling
- A user interface
- Device integrations
- Security controls
- Status feedback
The AI model itself is almost the easy bit.
Once all of those components begin working together, however, the system starts feeling much less like a chatbot and much more like an actual computer interface.
What’s Next?
There is still plenty I want to add.
The next stages are likely to include:
- Better conversation persistence
- Improved memory retrieval
- Scanner status linked directly to AI activity
- Local speech recognition
- KARR-style text-to-speech
- MQTT integration
- Home Assistant tools
- Node-RED automation
- Home lab monitoring
- A physical scanner
- Proper permissions around system actions
Eventually I want to be able to walk into the room and simply say:
KARR, status report.
and receive a spoken summary of the important systems running throughout Realm Labs.
Completely locally.
Because apparently building a home lab wasn’t enough.
It needed its own artificial intelligence.