
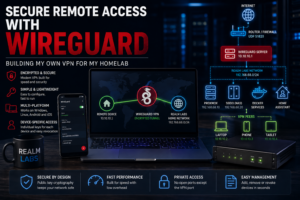

As Realm Labs grew, remote access became increasingly useful.
There are plenty of services inside the lab that I normally access only from the local network: management interfaces, dashboards, shared resources and other internal systems. That is fine when I am at home, but much less useful when I am away and need to check something.
I did not want to solve that by forwarding a collection of management ports directly through the router.
Instead, I wanted one secure route back into the network.
WireGuard became the VPN solution for that job.
The original version of this article explained the basic idea, but the important part is how WireGuard actually fits into a homelab: routing, peers, internal addressing and deciding what remote devices should be allowed to reach.
What I Wanted to Achieve
The requirement was simple:
Remote Device
     |
     | Encrypted connection
     v
WireGuard VPN
     |
     v
Realm Labs Network
     |
     +-- Internal services
     +-- Management interfaces
     +-- Servers
     +-- NAS
     +-- Home Assistant
Once connected, a remote device should be able to reach selected internal systems in much the same way as if it were connected to the home network.
The goals were:
- secure remote access
- no direct exposure of internal management ports
- individual configuration for each remote device
- the ability to revoke one device without affecting the others
- simple enough configuration that I could still understand it six months later
Why WireGuard?
WireGuard is a lightweight VPN protocol that works particularly well for this kind of setup.
The main reasons I like it are:
- straightforward configuration
- good performance
- small number of moving parts
- support across Windows, Linux, Android and iOS
- public-key authentication
- easy peer management
It does not require a complicated user database or certificate infrastructure for a small homelab deployment.
Each device has its own cryptographic identity.
That makes the model easy to understand:
WireGuard Server
     |
     +-- Laptop Peer
     |
     +-- Phone Peer
     |
     +-- Admin Device Peer
Understanding the WireGuard Model
WireGuard configuration is based around interfaces and peers.
The server has:
- its own private key
- its own public key
- a VPN IP address
- a listening UDP port
Each client has:
- its own private key
- its own public key
- its own VPN IP address
The server knows the public key of each authorised client.
The client knows the public key of the server.
Private keys stay private.
Planning the VPN Address Range
Before configuring WireGuard, it is worth choosing a dedicated subnet for VPN clients.
For example:
Home LAN:
192.168.68.0/24

WireGuard VPN:
10.10.10.0/24
The WireGuard server could then use:
10.10.10.1while clients use addresses such as:
Laptop
10.10.10.2

Phone
10.10.10.3

Tablet
10.10.10.4
Keeping the VPN on its own subnet makes routing and troubleshooting much easier.
Installing WireGuard
On a Debian-based Linux host, WireGuard can be installed with:
sudo apt update
sudo apt install wireguard -y
Once installed, the configuration is normally stored under:
/etc/wireguard/A common interface name is:
wg0which gives a configuration file of:
/etc/wireguard/wg0.confGenerate the Server Keys
WireGuard uses public and private key pairs.
Generate the server keys with:
wg genkey | tee server_private.key | wg pubkey > server_public.keyYou can then view them with:
cat server_private.keyand:
cat server_public.keyThe private key should be protected.
Do not publish it or include it in screenshots.
Basic Server Configuration
A simple server configuration might look like this:
[Interface]
Address = 10.10.10.1/24
ListenPort = 51820
PrivateKey = SERVER_PRIVATE_KEY
Save this as:
/etc/wireguard/wg0.confThen restrict access to the file:
sudo chmod 600 /etc/wireguard/wg0.confEnable IP Forwarding
A VPN server needs to forward traffic between the WireGuard network and the LAN.
On Linux, check the current IPv4 forwarding state with:
sysctl net.ipv4.ip_forwardTo enable it temporarily:
sudo sysctl -w net.ipv4.ip_forward=1To make it persistent, add this to:
/etc/sysctl.confnet.ipv4.ip_forward=1Then apply the configuration:
sudo sysctl -pWithout forwarding, the client may connect successfully to WireGuard but still be unable to reach anything beyond the VPN server itself.
That distinction is important.
Starting the WireGuard Interface
Bring the interface up with:
sudo wg-quick up wg0Check its status:
sudo wgYou should see information including:
- interface public key
- listening port
- configured peers
- latest handshake
- transfer statistics
To stop it:
sudo wg-quick down wg0Start WireGuard Automatically
Enable the VPN interface at boot:
sudo systemctl enable wg-quick@wg0Start it with:
sudo systemctl start wg-quick@wg0Check the service:
sudo systemctl status wg-quick@wg0Creating the First Client
Generate a separate key pair for the client.
For example:
wg genkey | tee laptop_private.key | wg pubkey > laptop_public.keyThe important rule is:
One device
    |
    +-- One key pair
    +-- One VPN IP
    +-- One peer entry
I do not reuse one client configuration across multiple devices.
Separate peers make management much cleaner.
Add the Client to the Server
Add the client’s public key to wg0.conf.
For example:
[Peer]
PublicKey = LAPTOP_PUBLIC_KEY
AllowedIPs = 10.10.10.2/32
The /32 means that this peer owns one specific VPN address:
10.10.10.2A second device might use:
[Peer]
PublicKey = PHONE_PUBLIC_KEY
AllowedIPs = 10.10.10.3/32
This makes it easy to identify devices later.
Client Configuration
A basic client configuration might look like:
[Interface]
PrivateKey = LAPTOP_PRIVATE_KEY
Address = 10.10.10.2/24
DNS = 192.168.68.20

[Peer]
PublicKey = SERVER_PUBLIC_KEY
Endpoint = vpn.example.com:51820
AllowedIPs = 192.168.68.0/24, 10.10.10.0/24
PersistentKeepalive = 25
Replace the hostname and addresses with the values used by your own network.
What AllowedIPs Actually Does
AllowedIPs is one of the most important WireGuard settings.
On the client, it effectively tells WireGuard:
Send traffic for these networks through the VPN.For example:
AllowedIPs = 192.168.68.0/24means only traffic destined for the home LAN is sent through WireGuard.
Normal internet traffic continues through the client’s normal internet connection.
This is known as split tunnelling.
Split Tunnel or Full Tunnel?
There are two common approaches.
Split Tunnel
Only traffic for the home network goes through the VPN.
For example:
AllowedIPs = 192.168.68.0/24, 10.10.10.0/24The flow becomes:
Realm Labs traffic
      |
      +--> WireGuard

Everything else
      |
      +--> Normal internet connection
This is generally what I prefer for homelab administration.
Full Tunnel
All traffic goes through the VPN:
AllowedIPs = 0.0.0.0/0The flow becomes:
Everything
    |
    v
WireGuard
    |
    v
Home Network
    |
    v
Internet
This can be useful when using untrusted public networks, but it also means the home connection carries all of the client’s traffic.
Routing to the Home LAN
A successful WireGuard handshake does not automatically mean the client can reach the rest of the home network.
Traffic has to be routed correctly.
The overall path is:
Remote Laptop
10.10.10.2
     |
     v
WireGuard Server
10.10.10.1
     |
     v
Home LAN
192.168.68.0/24
This is where many VPN configurations go wrong.
The encrypted tunnel itself works, but the network behind it does not know what to do with the VPN client’s traffic.
NAT as the Simple Approach
One way to solve this is NAT or masquerading on the WireGuard server.
For example, using iptables:
sudo iptables -t nat -A POSTROUTING \
  -s 10.10.10.0/24 \
  -o eth0 \
  -j MASQUERADE
This makes traffic from VPN clients appear to the home LAN as though it came from the WireGuard server itself.
That is often the easiest option for a small homelab.
The downside is that internal systems no longer see the original VPN client address.
Routing Without NAT
A cleaner network design is to teach the main router how to reach the VPN network.
Conceptually:
Destination:
10.10.10.0/24

Gateway:
WireGuard server LAN IP
The LAN can then route directly back to VPN clients.
This preserves the real VPN client addresses and gives more control over firewall rules.
Whether this is practical depends on the capabilities of the router and network design.
DNS Over the VPN
If I want remote clients to access systems using internal hostnames rather than raw IP addresses, the VPN client also needs access to internal DNS.
For example:
DNS = 192.168.68.20This means a connected client may be able to resolve internal names such as:
seido.order.realminstead of needing:
192.168.68.20That is much nicer to work with.
It also reduces the number of hard-coded IP addresses I need to remember.
Public Endpoint
The client needs some way to find the WireGuard server from the internet.
That normally means:
Public IPor:
DNS hostnameFor example:
Endpoint = vpn.example.com:51820Using a hostname is preferable if the public IP can change.
Dynamic DNS can then keep the hostname pointed at the current address.
Router Configuration
WireGuard normally listens on UDP port:
51820If the WireGuard server sits behind a normal home router, the router needs to forward that UDP port to the WireGuard host.
Conceptually:
Internet
    |
UDP 51820
    |
Router
    |
Port Forward
    |
WireGuard Server
This should be one deliberate VPN port, not dozens of individual management interfaces.
Why This Is Better Than Forwarding Everything
Without a VPN, remote access can easily become:
Port 8080 -> App 1
Port 3000 -> App 2
Port 9443 -> Portainer
Port 8123 -> Home Assistant
Port 22   -> SSH
I do not like that design.
With WireGuard:
Internet
    |
UDP 51820
    |
WireGuard
    |
Authenticated VPN Client
    |
Internal Services
The internal applications do not need to be individually exposed.
Device-Specific Peers
Each device has its own peer configuration.
For example:
Laptop
    |
10.10.10.2

Phone
    |
10.10.10.3

Tablet
    |
10.10.10.4
This provides a useful security benefit.
If I lose a device, I can remove only that peer from the server.
The rest of the VPN remains unchanged.
Revoking a Device
If a client should no longer have access, remove its peer entry from the WireGuard server configuration.
Then restart or reload WireGuard.
The key belonging to that device will no longer be accepted.
That is much cleaner than changing one shared VPN password used by every device.
Testing the Tunnel
Once the client connects, start with the simplest tests.
Check WireGuard
On the server:
sudo wgLook for a recent:
latest handshakeIf there is no handshake, there is no point troubleshooting internal routing yet.
Ping the VPN Server
From the client:
ping 10.10.10.1If this works, the encrypted tunnel itself is functioning.
Ping a LAN Device
Next try an internal address:
ping 192.168.68.20If the VPN server responds but the LAN device does not, the problem is probably:
- forwarding
- routing
- firewall
- NAT
rather than WireGuard authentication.
Test an Actual Service
Finally test something useful.
For example:
https://internal-dashboardor:
\\seido\Shareor an internal SSH/RDP connection.
That confirms the full path rather than just ICMP connectivity.
Useful Troubleshooting Order
I find it easier to work through WireGuard problems in layers.
1. Does WireGuard start?
        |
2. Does the client handshake?
        |
3. Can the client reach the VPN server?
        |
4. Can the client reach the LAN?
        |
5. Does DNS work?
        |
6. Can the required application be reached?
This is much better than changing five firewall and routing settings at once.
Check the WireGuard Status
On the server:
sudo wgUseful information includes:
latest handshake
transfer
endpoint
allowed ips
If the handshake is recent and transfer counters are increasing, the encrypted part of the connection is probably working.
Firewall Considerations
A remote VPN does not mean every connected device should automatically have unrestricted access to everything.
It is worth thinking about what the VPN client actually needs.
For example:
VPN Client
     |
     +--> Home Assistant
     +--> Synology
     +--> Proxmox
     +--> SSH
     X
     +--> Other networks
The more segmented the network becomes, the more useful explicit firewall rules become.
Keep WireGuard Updated
The server should be treated like any other internet-facing system.
That means:
- keep the operating system patched
- keep WireGuard updated
- remove unused peer configurations
- review firewall rules
- monitor unusual behaviour
- protect the server’s private key
Remote access is useful precisely because it creates a path into the internal network.
That path deserves attention.
Do Not Share Private Keys
WireGuard does not work like a normal username and password service.
Private keys are the identity of the peer.
A configuration containing:
PrivateKey =should therefore be treated as sensitive.
If a private key is exposed, generate a new one and replace that peer.
Remote Access and Cloudflare Tunnel
Realm Labs also uses Cloudflare Tunnel for some externally accessible web services.
That does not make WireGuard redundant.
They solve slightly different problems.
Cloudflare Tunnel works very well for publishing selected web applications.
WireGuard is more useful when I want broader network-level access.
For example:
Cloudflare Tunnel
      |
      +--> Specific web service


WireGuard
      |
      +--> Internal network access
      +--> SMB
      +--> SSH
      +--> RDP
      +--> Management interfaces
I use whichever model fits the service.
WireGuard and Remote Desktop
One useful example is Windows Remote Desktop.
Rather than exposing RDP directly to the internet, a remote machine can first join the WireGuard VPN.
The flow becomes:
Remote Laptop
      |
WireGuard
      |
Realm Labs LAN
      |
Windows PC
      |
RDP
The Windows machine itself does not require a public RDP port.
WireGuard and Synology
The same approach works for Synology storage.
Once connected to the VPN, a client can access an SMB share using the internal network path.
For example:
\\seido\ShareThat is useful when I need access to files without making SMB itself internet-facing.
WireGuard and Proxmox
Management interfaces are another good use case.
I do not want the Proxmox management interface exposed directly to the public internet.
Instead:
Remote Device
      |
WireGuard VPN
      |
Internal Network
      |
Proxmox
The management interface remains internal while still being available remotely when I need it.
Monitoring Connected Peers
The wg command makes it easy to see which peers have recently connected.
For example:
sudo wg showA peer with a recent handshake is actively communicating.
A peer that has not connected for months may be a candidate for cleanup.
As the peer list grows, giving devices sensible names in documentation becomes important.
A random public key is not particularly memorable six months later.
Document the Configuration
I keep a record of:
- device name
- VPN address
- public key
- purpose
- date added
For example:
Device: Laptop
Address: 10.10.10.2
Purpose: Remote administration

Device: Phone
Address: 10.10.10.3
Purpose: Mobile access
Do not record private keys in general documentation unless that documentation is itself securely protected.
What I Have Learned
The biggest lesson from building remote access was that installing WireGuard itself is the easy part.
The interesting problems come from everything around it:
- routing
- DNS
- firewall rules
- network addressing
- NAT
- access control
A VPN can report:
Connectedwhile still being completely useless for accessing the network behind it.
Understanding the traffic path matters much more than simply getting a successful handshake.
Security Versus Convenience
Remote access needs to be convenient enough that I will actually use it.
But convenience should not turn into:
Expose everything
Allow everything
Forget about it
The goal is controlled access.
WireGuard provides the secure transport.
Network design still decides where that transport is allowed to take you.
The Result
WireGuard gives Realm Labs a secure route back into the network when I am away from home.
Instead of exposing individual management services directly to the internet, I can establish one encrypted VPN connection and then access internal systems through their normal private addresses.
Each remote device has its own peer, its own key pair and its own VPN address.
If a device is lost or retired, that peer can be removed without changing the rest of the setup.
Most importantly, WireGuard has made remote access feel like part of the network rather than a collection of unrelated workarounds.
That is exactly what I wanted from it.