
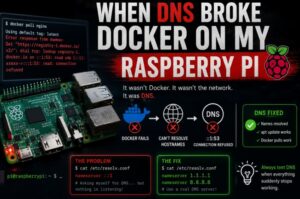

One of the more misleading problems I’ve hit in the Realm Labs setup started with Docker.
Or at least, that’s what it looked like.
I was trying to pull an image on one of my Raspberry Pis and Docker simply refused to cooperate.
The error pointed towards Docker Hub.
Then apt started failing too.
At that point it became clear this wasn’t really a Docker problem at all.
The Raspberry Pi had lost DNS resolution.
And because almost everything on a modern Linux system depends on DNS at some point, the symptoms appeared all over the place.
The Initial Symptom
The first sign of trouble came when Docker tried to contact its registry.
Instead of pulling the image, it failed while attempting to resolve:
registry-1.docker.io
The exact error can vary, but the important part was that the hostname couldn’t be resolved.
At first, that’s easy to mistake for:
- Docker Hub being unavailable
- Docker networking being broken
- A firewall problem
- Internet connectivity being down
- A bad Docker configuration
So the obvious first check was whether the Pi could actually reach the network.
Checking Basic Connectivity
Before touching Docker, I tested connectivity directly from the Pi.
A useful test is to ping an IP address instead of a hostname:
ping 8.8.8.8
If that works, the machine clearly has network connectivity.
Then try a hostname:
ping google.com
This distinction is incredibly useful.
If this works:
ping 8.8.8.8
but this doesn’t:
ping google.com
then the problem probably isn’t your network connection.
It’s DNS.
That was exactly the situation here.
Docker Wasn’t the Only Thing Failing
The next clue came from apt.
Running:
sudo apt update
also failed to resolve package repository names such as:
deb.debian.org
That was important because Docker and apt are completely separate applications.
If both of them fail to resolve hostnames, the common dependency is DNS.
The problem was now looking more like this:
Docker fails
       \
        \
         DNS resolution broken
        /
       /
apt fails
That narrowed the investigation considerably.
Checking the Resolver
On Linux, the first obvious place to look is:
cat /etc/resolv.conf
This tells you which DNS resolver the system is currently trying to use.
In my case, the Pi had effectively ended up pointing DNS requests back towards the local machine.
The resolver was using:
::1
That is the IPv6 loopback address.
It’s the IPv6 equivalent of:
127.0.0.1
So the Pi was effectively saying:
"Ask myself for DNS."
That would be perfectly valid if a DNS resolver was actually running locally.
The problem was that nothing useful was listening there.
The Critical Error
Testing DNS revealed the more useful symptom:
connection refused
against:
[::1]:53
Port 53 is DNS.
So the situation was effectively:
Application
    |
    | DNS lookup
    v
::1 port 53
    |
    X
Nothing listening
The Pi had a working network connection.
It simply had nowhere functional to send DNS queries.
Why This Broke Docker
When you run something like:
docker pull nginx
Docker doesn’t magically know the address of Docker Hub.
It needs to resolve the hostname first.
Conceptually:
docker pull
    |
    v
registry-1.docker.io
    |
    v
DNS lookup
    |
    X
DNS broken
The result looks like Docker can’t connect to its registry.
But Docker never gets that far.
The hostname can’t even be translated into an IP address.
The same applies to:
sudo apt update
If Debian’s repository hostname can’t be resolved, package management fails too.
A Quick Temporary Fix
The fastest way to prove DNS was the problem was to temporarily point the Pi at a known working DNS server.
For example:
8.8.8.8
or:
1.1.1.1
Depending on how networking is configured, a temporary /etc/resolv.conf might look like:
nameserver 1.1.1.1
nameserver 8.8.8.8
After making that change, testing again with:
ping google.com
showed the important difference.
Name resolution started working.
Then:
sudo apt update
worked.
And Docker pulls started working again.
That confirmed the root cause.
Why Editing resolv.conf Isn’t Always the Real Fix
There is an important catch here.
On many modern Linux systems, /etc/resolv.conf is generated automatically.
It may be controlled by:
- NetworkManager
- systemd-resolved
- dhcpcd
- DHCP
- Another local resolver
That means manually editing:
/etc/resolv.conf
may only be temporary.
A reboot or network restart can overwrite the file and put the broken DNS configuration straight back.
So while manually setting a resolver is a very useful test, it’s important to fix the source of the configuration too.
Finding Out Who Controls DNS
One useful first check is:
ls -l /etc/resolv.conf
If it is a symbolic link, the output can reveal which service is generating it.
You can also check services such as:
systemctl status systemd-resolved
or:
systemctl status NetworkManager
On Raspberry Pi OS, the exact networking stack depends on the version and how the system has been configured.
The important question is:
Where is this DNS configuration actually coming from?
In My Case, the Local Resolver Wasn’t Working
The problem ultimately came down to the Pi being configured to use a local DNS resolver that wasn’t actually accepting DNS requests.
The system was trying:
[::1]:53
and getting:
connection refused
That is a very different failure from something like a DNS timeout.
A timeout might mean packets aren’t reaching the server.
A refusal normally means you’ve reached the machine, but nothing is listening on that port.
That made the diagnosis much more specific.
Testing Port 53 Directly
If you want to see whether anything is listening for DNS locally, you can check port 53:
sudo ss -tulpn | grep :53
or:
sudo netstat -tulpn | grep :53
If the system is configured to use localhost for DNS, but these commands show nothing listening on port 53, you’ve found a fairly obvious mismatch.
The configuration says:
Use local DNS
but the machine says:
I don't have a local DNS server.
Checking DNS Properly
Rather than relying only on ping, there are better tools for testing DNS.
For example:
nslookup google.com
or:
dig google.com
You can also test a specific resolver directly:
nslookup google.com 1.1.1.1
If this works:
nslookup google.com 1.1.1.1
but the normal:
nslookup google.com
fails, then your configured resolver is almost certainly the problem.
Fixing the DNS Configuration Properly
Once I’d proved the issue, the correct fix was to make sure the Pi used an actual reachable DNS server rather than a dead localhost resolver.
In a home lab, that might be:
Router
or:
Pi-hole
or:
Synology DNS
or another internal resolver.
The important thing is that the configured IP actually answers DNS requests on port 53.
A sensible flow is:
Raspberry Pi
     |
     v
Internal DNS Server
     |
     v
Upstream DNS
     |
     v
Internet
rather than:
Raspberry Pi
     |
     v
localhost
     |
     X
No resolver
Restarting the Networking Stack
After correcting DNS settings, it may be useful to restart whichever service is managing the network.
Depending on the system, that might be:
sudo systemctl restart NetworkManager
or:
sudo systemctl restart systemd-resolved
On some Raspberry Pi configurations, rebooting is the simplest way to make sure the new network settings are applied cleanly:
sudo reboot
Once the system came back, the important tests were:
ping google.com
sudo apt update
and:
docker pull hello-world
If all three work, you’ve covered basic DNS, package repositories and Docker registry resolution.
Why Restarting Docker Alone Didn’t Help
It’s tempting to try:
sudo systemctl restart docker
whenever Docker behaves strangely.
And there’s nothing wrong with trying it.
But in this case, restarting Docker couldn’t possibly fix the underlying issue.
Docker was asking the operating system to resolve a hostname.
The operating system’s resolver was broken.
The dependency chain looked like this:
Docker
   |
   v
Linux networking
   |
   v
DNS resolver configuration
   |
   X
Broken
Restarting the application at the top doesn’t repair the broken service underneath it.
The Bigger Lesson: Test the Layer Below
This problem changed how I troubleshoot network-related application failures.
If something can’t connect to an internet service, I now work down the stack instead of immediately changing the application.
For example:
Application fails
      |
      v
Can I resolve the hostname?
      |
      v
Can I reach an external IP?
      |
      v
Do I have a valid route?
      |
      v
Is the interface actually up?
That makes it much easier to identify the layer where the failure really exists.
A Simple Troubleshooting Sequence
If Docker can’t pull an image, I now work through something like this.
1. Check network connectivity
ping 1.1.1.1
If this fails, you probably have a network or routing issue.
2. Check DNS resolution
ping google.com
If the IP ping works but the hostname doesn’t, investigate DNS.
3. Inspect the resolver configuration
cat /etc/resolv.conf
Look at the configured nameserver entries.
4. Test a known resolver directly
nslookup google.com 1.1.1.1
If that works, your configured DNS server is likely the problem.
5. Check whether a local resolver is actually running
If /etc/resolv.conf points to localhost:
sudo ss -tulpn | grep :53
6. Test another application
sudo apt update
If both Docker and apt fail in a similar way, think about shared dependencies rather than application-specific configuration.
7. Fix the DNS source
Don’t rely permanently on manually editing /etc/resolv.conf if another service is generating it.
What the Failure Looked Like
The original symptom was:
Docker cannot pull an image
The actual chain was:
Docker needs registry-1.docker.io
            |
            v
Linux tries to resolve the hostname
            |
            v
DNS configured as ::1
            |
            v
Nothing listening on port 53
            |
            v
Connection refused
            |
            v
Docker pull fails
And because the same resolver was used by the rest of the operating system:
apt update fails too
Once DNS was fixed, both problems disappeared.
The Realm Labs Takeaway
This was a relatively small issue, but it was a useful reminder of how misleading error messages can be.
Docker appeared broken.
The Debian repositories appeared unavailable.
Internet-based services appeared unreachable.
But the Pi was still connected to the network perfectly well.
It simply couldn’t translate names into addresses.
Whenever multiple unrelated applications suddenly stop reaching services by hostname, DNS should be very high on the troubleshooting list.
In this case, one simple test exposed the whole problem:
ping 8.8.8.8
worked.
While:
ping google.com
didn’t.
Sometimes that difference tells you almost everything you need to know.