
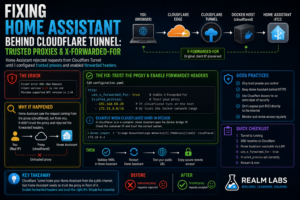

Publishing Home Assistant through Cloudflare Tunnel looked like it should be straightforward.
I already had Cloudflare Tunnel working for other Realm Labs services, so the basic path was familiar:
Internet
   |
   v
Cloudflare
   |
   v
Cloudflare Tunnel
   |
   v
Home Assistant
The tunnel connected.
The hostname resolved.
Cloudflare could reach the server.
But Home Assistant wasn’t happy.
Instead of simply accepting the connection, it complained about the reverse proxy.
The fix was not in Cloudflare.
It was in Home Assistant.
I needed to tell Home Assistant that the proxy sitting in front of it was trusted and that it should accept forwarded client information from that proxy.
The Setup
Home Assistant was running internally on the Realm Labs network.
The local service was available on the normal port:
8123
Internally, that meant something like:
http://192.168.68.x:8123
I wanted to make it available remotely through a Realm Labs hostname without opening port 8123 directly on the router.
Cloudflare Tunnel was the obvious solution.
The architecture became:
Remote Device
     |
     v
Cloudflare
     |
     v
Cloudflare Tunnel
     |
     v
Home Assistant
192.168.68.x:8123
That keeps the Home Assistant service off the public internet while still allowing remote access through Cloudflare.
The Tunnel Itself Worked
This was important.
The Cloudflare side was actually doing its job.
The tunnel could reach Home Assistant.
The problem appeared when Home Assistant looked at where the request had come from.
From Home Assistant’s point of view, the connection was no longer arriving directly from my browser.
It was arriving from a proxy.
That distinction matters.
What a Reverse Proxy Changes
Without Cloudflare Tunnel, the path might look like:
Browser
   |
   v
Home Assistant
Home Assistant sees the connection directly.
With a tunnel or reverse proxy:
Browser
   |
   v
Cloudflare
   |
   v
Tunnel / Proxy
   |
   v
Home Assistant
Home Assistant sees the proxy as the immediate client.
The proxy then includes information about the original request in HTTP headers.
One of the important headers is:
X-Forwarded-For
This tells the backend which client originally made the request.
Why Home Assistant Doesn’t Trust This Automatically
Accepting forwarded headers blindly would be dangerous.
Imagine anybody on the network could send:
X-Forwarded-For: 192.168.68.10
and Home Assistant simply believed it.
That could allow clients to pretend requests originated somewhere else.
So Home Assistant requires you to explicitly define which reverse proxies are trusted.
That is a good security feature.
It just means the configuration needs to match the architecture.
The Error
The symptoms can vary slightly depending on Home Assistant version and configuration, but the important part is that Home Assistant identifies the incoming request as coming through an untrusted proxy.
That points directly towards the HTTP configuration.
The relevant settings live in:
configuration.yaml
The Home Assistant HTTP Configuration
The important section is:
http:
  use_x_forwarded_for: true
  trusted_proxies:
    - 192.168.68.x
The exact trusted proxy address depends on how Cloudflare Tunnel is running.
The two important settings are:
use_x_forwarded_for
and:
trusted_proxies
Enabling X-Forwarded-For
The first setting is:
use_x_forwarded_for: true
This tells Home Assistant:
Accept the X-Forwarded-For header
from trusted reverse proxies.
Without this, Home Assistant does not use that forwarded client information in the expected way.
Defining the Trusted Proxy
The second part is:
trusted_proxies:
This is where Home Assistant is told which IP addresses are allowed to act as reverse proxies.
For example:
http:
  use_x_forwarded_for: true
  trusted_proxies:
    - 192.168.68.20
if the reverse proxy or tunnel connector is actually running from:
192.168.68.20
The address must match the machine or network Home Assistant sees the proxy connection coming from.
When the Proxy Is Running in Docker
This becomes more interesting when Cloudflare Tunnel is running as a Docker container.
The connection Home Assistant sees may come from a Docker bridge address rather than the physical host IP.
For example:
172.18.0.x
or another private Docker subnet.
The architecture becomes:
Cloudflare
    |
    v
cloudflared container
    |
    v
Docker bridge
172.x.x.x
    |
    v
Home Assistant
If Home Assistant sees the proxy as:
172.18.0.5
but the configuration only trusts:
192.168.68.20
the request may still be rejected.
Trusting a Proxy Network
Where the container address can change, it can make more sense to trust the relevant Docker subnet.
For example:
http:
  use_x_forwarded_for: true
  trusted_proxies:
    - 172.18.0.0/16
The exact subnet should match the Docker network actually being used.
I would not simply trust enormous address ranges without checking.
The goal is to trust the proxy.
Not every device everywhere.
Finding the Docker Network
On the Docker host:
docker network ls
Then inspect the relevant network:
docker network inspect <network-name>
Look for the subnet.
For example:
"Subnet": "172.18.0.0/16"
That tells you what range the containers are using.
You can then decide whether the whole network should be trusted or whether a specific address is more appropriate.
Finding the cloudflared Address
If the tunnel runs in Docker:
docker inspect cloudflared
can reveal its network details.
You can also use:
docker inspect -f '{{range.NetworkSettings.Networks}}{{.IPAddress}}{{end}}' cloudflared
That returns the container’s current IP address.
For example:
172.18.0.4
This is useful when trying to understand exactly what Home Assistant is seeing.
The Working Configuration
A typical working configuration might look like:
http:
  use_x_forwarded_for: true
  trusted_proxies:
    - 172.18.0.0/16
or where the request comes directly from a known host:
http:
  use_x_forwarded_for: true
  trusted_proxies:
    - 192.168.68.20
The right answer depends on the deployment.
The principle is the same.
Validate the YAML Before Restarting
Home Assistant configuration files are sensitive to indentation.
This is valid:
http:
  use_x_forwarded_for: true
  trusted_proxies:
    - 172.18.0.0/16
This is not the sort of place where I want to discover an indentation error after a restart.
Before restarting Home Assistant, use its configuration-check functionality where available.
The exact interface varies by version, but the important thing is to validate the configuration first.
Restart Home Assistant
After saving the change, restart Home Assistant.
Once it comes back, try the Cloudflare hostname again.
The expected path should now be:
Browser
   |
   v
Cloudflare
   |
   v
Trusted Proxy
   |
   | X-Forwarded-For accepted
   v
Home Assistant
And the page should load normally.
Why This Is Better Than Opening Port 8123
The alternative would have been traditional port forwarding:
Internet
   |
Router
   |
TCP 8123
   |
Home Assistant
That exposes the service directly through the public IP.
Cloudflare Tunnel instead gives:
Internet
   |
Cloudflare
   |
Outbound tunnel
   |
Home Assistant
The home router does not need an inbound port forwarding rule for Home Assistant.
That is a much cleaner arrangement for my setup.
Cloudflare Tunnel Does Not Replace Home Assistant Security
This is worth stressing.
A tunnel doesn’t mean Home Assistant authentication no longer matters.
I still want:
- Strong Home Assistant credentials
- Multi-factor authentication where appropriate
- Sensible Cloudflare Access policies if used
- HTTPS on the public hostname
- Minimal exposure
The tunnel solves connectivity.
It doesn’t mean the backend should blindly trust everything.
Why Trusted Proxies Should Stay Narrow
It would be easy to configure something such as:
trusted_proxies:
  - 0.0.0.0/0
That would probably make proxy complaints disappear.
It would also defeat the point of having a trusted proxy list.
I only want Home Assistant accepting forwarded client information from infrastructure I control.
So the range should be as specific as practical.
Troubleshooting the Wrong Proxy Address
If the configuration looks right but Home Assistant still reports an untrusted proxy, the first question should be:
What IP is Home Assistant actually seeing?
Don’t assume.
Check the logs.
If the log shows something like:
Received X-Forwarded-For header from an untrusted proxy 172.18.0.4
then that address is the clue.
The configuration needs to account for:
172.18.0.4
not whichever IP I expected the proxy to use.
Containers Add an Extra Network Layer
This is one of the recurring themes in Realm Labs.
Docker simplifies application deployment.
It can make network troubleshooting less obvious.
What looks like:
Synology
192.168.68.20
from the rest of the LAN may internally look like:
Docker Host
192.168.68.20
    |
    +-- cloudflared
        172.18.0.4
Home Assistant may care about the second address.
That’s why looking at the actual request path matters.
Internal Access Still Worked
Another useful clue was that accessing Home Assistant directly over the LAN continued to work.
For example:
http://192.168.68.x:8123
worked.
But:
https://homeassistant.realmlabs.uk
did not.
That immediately pointed towards the extra infrastructure in the second path.
The comparison was:
Internal:
Client -> Home Assistant
WORKS
versus:
External:
Client -> Cloudflare -> Tunnel -> Home Assistant
FAILS
That makes the proxy layer the obvious area to investigate.
Test One Layer at a Time
This became another useful troubleshooting pattern.
Test Home Assistant directly
http://192.168.68.x:8123
If this fails, the problem isn’t Cloudflare.
Check cloudflared
Make sure the tunnel container or service is running.
For Docker:
docker ps
Then:
docker logs cloudflared
Confirm the public hostname
Make sure DNS resolves correctly.
For example:
nslookup homeassistant.realmlabs.uk
Check Home Assistant logs
Look for trusted-proxy or forwarded-header messages.
This quickly narrows the failure.
Cloudflare Access Can Sit in Front Too
Once the tunnel itself is working, Cloudflare Access can add another authentication layer.
That gives a path like:
Remote User
    |
    v
Cloudflare Access
    |
    v
Cloudflare Tunnel
    |
    v
Home Assistant Login
That means an attacker doesn’t necessarily get as far as the Home Assistant login page without passing the Cloudflare policy first.
Whether that makes sense depends on how you use Home Assistant, especially mobile-app integrations and callbacks.
But architecturally, it’s a useful option.
Don’t Forget the Home Assistant Mobile App
Remote access isn’t only about opening the web page.
The Home Assistant mobile app also needs a usable external URL.
Once the public hostname is working, the app can use something such as:
https://homeassistant.realmlabs.uk
as the external address.
That gives the same Home Assistant instance:
Internal URL
+
External URL
without exposing port 8123 directly.
The Failure Chain
The original symptom looked like:
Cloudflare Tunnel doesn't work with Home Assistant
The actual chain was:
Browser
    |
    v
Cloudflare
    |
    v
cloudflared proxy
    |
    v
Home Assistant receives forwarded headers
    |
    v
Proxy is not trusted
    |
    X
Request rejected
After the configuration change:
Browser
    |
    v
Cloudflare
    |
    v
Trusted cloudflared proxy
    |
    v
X-Forwarded-For accepted
    |
    v
Home Assistant loads
A Good Troubleshooting Checklist
If Home Assistant works locally but fails through a reverse proxy or Cloudflare Tunnel, I would check:
1. Does Home Assistant work directly?
http://home-assistant-ip:8123
2. Is the tunnel running?
docker ps
or check the relevant service.
3. Does the hostname resolve?
nslookup homeassistant.example.com
4. What do the Home Assistant logs say?
Look specifically for:
untrusted proxy
and:
X-Forwarded-For
5. What IP is the proxy actually using?
If Docker is involved:
docker inspect cloudflared
6. Enable forwarded headers
use_x_forwarded_for: true
7. Trust the actual proxy
trusted_proxies:
using the correct IP or subnet.
8. Restart and test again
Only after validating the YAML.
The Final Realm Labs Setup
The finished arrangement became:
                    Internet
                       |
                       v
                Cloudflare DNS
                       |
                       v
                Cloudflare Edge
                       |
                       v
               Cloudflare Tunnel
                       |
                       v
                cloudflared
                 Docker Host
                       |
                       v
                Home Assistant
                    :8123
With Home Assistant configured to trust the proxy sitting immediately in front of it.
No router port forwarding.
No direct public exposure of port 8123.
And no more reverse-proxy errors.
The Realm Labs Takeaway
The tunnel itself wasn’t broken.
Home Assistant was doing exactly what it should.
It received forwarded client information from a proxy it didn’t recognise and refused to simply trust it.
The fix was:
http:
  use_x_forwarded_for: true
  trusted_proxies:
    - <actual proxy IP or subnet>
The most important part is:
actual proxy
not the address you assume the request comes from.
Especially when Docker is sitting between the services.
Once the request path was understood, the fix was simple.
Another case where the real solution wasn’t changing the application or the tunnel.
It was teaching each layer of the infrastructure to trust the next one properly.