
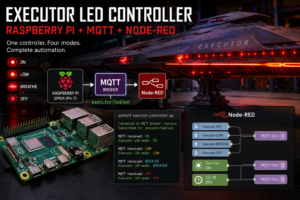

I recently revisited the lighting setup on my Executor model. The original system worked, but it had evolved into several separate Python scripts for turning the LEDs on, turning them off and running a breathing effect.
It was functional, but not particularly tidy.
The goal of this rework was to replace those individual scripts with a single permanent LED controller running on the Raspberry Pi, expose the lighting modes through MQTT, and then use Node-RED to handle the automation and scheduling.
The finished setup gives me four simple lighting modes:
- ON
- OFF
- LOW
- BREATHE
Everything is controlled through a single MQTT topic:
executor/led/set
The MQTT broker is running on my Synology infrastructure at:
192.168.68.20
The Original Executor LED Setup
The original Executor lighting scripts controlled the LED from physical pin 7 on the Raspberry Pi.
This corresponds to:
BCM GPIO4
Physical pin 7
There were separate scripts for different functions, including a basic ON script and a PWM breathing script.
The breathing effect used Python’s RPi.GPIO PWM support at 1 kHz and stepped the duty cycle between 0 and 100%.
That worked, but having separate scripts made it harder to manage from Node-RED and meant different processes could potentially compete for control of the same GPIO.
The better solution was to have one process permanently own GPIO4.
Building a Single MQTT LED Controller
I replaced the separate scripts with:
executor_controller.py
The controller runs continuously and subscribes to:
executor/led/set
It accepts four commands:
ON
OFF
LOW
BREATHE
The GPIO configuration is:
LED_PIN = 4
PWM_FREQUENCY = 1000
One useful discovery during testing was that the Executor lighting circuit is active-high.
Initially I had assumed the opposite, which resulted in ON and OFF being reversed and LOW effectively switching the LEDs fully on.
The final behaviour is:
GPIO HIGH = LED ON
GPIO LOW  = LED OFF
That also makes the PWM calculation straightforward: the requested brightness percentage can be sent directly to the PWM duty cycle.
For example:
def set_brightness(brightness):
    brightness = max(0, min(100, float(brightness)))
    ensure_pwm()
    pwm.ChangeDutyCycle(brightness)
The LOW Lighting Mode
I also wanted something between completely on and completely off.
The LOW command currently runs the lighting at:
20%
This gives the model a subtle illuminated state without having the LEDs running at full brightness.
The value is simply configured in the Python controller:
LOW_BRIGHTNESS = 20
This means I can easily adjust it later without changing anything in Node-RED.
Improving the Breathing Effect
The original breathing script moved in 5% brightness increments with delays between each step.
Although it worked, the transitions were visibly stepped.
The new controller instead uses:
BREATHE_MIN = 3
BREATHE_MAX = 100
BREATHE_STEP = 1
BREATHE_DELAY = 0.02
This produces a considerably smoother fade.
The controller continuously fades:
3% → 100% → 3%
while the current mode remains BREATHE.
As soon as another MQTT command arrives, such as:
ON
the breathing worker exits its current fade and the new mode takes control.
This means Node-RED doesn’t have to start and stop individual Python processes anymore.
It simply publishes a new command.
Testing the Controller with MQTT
Before making the script permanent I tested each state directly from the Raspberry Pi.
Full brightness
mosquitto_pub -h 192.168.68.20 \
-t executor/led/set \
-m ON
Low brightness
mosquitto_pub -h 192.168.68.20 \
-t executor/led/set \
-m LOW
Breathing mode
mosquitto_pub -h 192.168.68.20 \
-t executor/led/set \
-m BREATHE
Off
mosquitto_pub -h 192.168.68.20 \
-t executor/led/set \
-m OFF
The controller reports each received command in the terminal:
MQTT received: ON
Executor LED mode: ON

MQTT received: LOW
Executor LED mode: LOW

MQTT received: BREATHE
Executor LED mode: BREATHE

MQTT received: OFF
Executor LED mode: OFF
This made it easy to verify that MQTT communication and GPIO control were both working before moving on to automation.
Running the Executor Controller Permanently
I don’t want to manually start the Python controller every time the Raspberry Pi reboots, so the next step was creating a systemd service.
The service is:
/etc/systemd/system/executor-led.service
with the following configuration:
[Unit]
Description=Executor MQTT LED Controller
After=network-online.target
Wants=network-online.target

[Service]
Type=simple
User=turokhan
WorkingDirectory=/home/turokhan
ExecStart=/usr/bin/python3 /home/Seido/Raiden/Projects/LinuxStuff/Rpi4/Scripts/Executor/executor_controller.py
Restart=always
RestartSec=3

[Install]
WantedBy=multi-user.target
The WorkingDirectory entry turned out to be important.
Fixing the lgpio systemd Error
The controller worked perfectly when launched manually:
python3 /home/Seido/Raiden/Projects/LinuxStuff/Rpi4/Scripts/Executor/executor_controller.py
but initially failed when started through systemd.
The journal showed:
xCreatePipe: Can't set permissions
Operation not permitted
followed by:
FileNotFoundError: .lgd-nfy-3
The issue came from the lgpio backend used by RPi.GPIO.
Under systemd, the process had effectively been starting with / as its working directory. lgpio attempted to create its notification pipe there, but the normal user account didn’t have permission.
Adding:
WorkingDirectory=/home/turokhan
gave lgpio a writable location and solved the problem without having to run the complete controller as root.
The service could then be enabled with:
sudo systemctl daemon-reload
sudo systemctl enable --now executor-led.service
and checked with:
systemctl status executor-led.service
The desired result is:
Active: active (running)
The controller will now start automatically whenever the Raspberry Pi boots and systemd will restart it automatically if the process exits unexpectedly.
Adding Node-RED Automation to the Executor
With the Raspberry Pi side running permanently, the next part of the project was Node-RED.
Node-RED doesn’t directly manipulate the GPIO anymore.
Instead, it simply publishes commands to the MQTT controller.
This keeps the automation layer separate from the hardware control layer.
The architecture is now:
Node-RED
   |
   v
MQTT
executor/led/set
   |
   v
executor_controller.py
   |
   v
GPIO4
   |
   v
Executor LEDs
This is a much cleaner arrangement than having Node-RED repeatedly execute Python scripts.
Manual Executor Controls in Node-RED
I created four Inject nodes:
Executor ON
Executor LOW
Executor BREATHE
Executor OFF
Each one publishes the corresponding string to:
executor/led/set
For example:
Payload: ON
Topic: executor/led/set
All four nodes feed into a single MQTT Out node connected to the broker:
192.168.68.20:1883
This provides quick manual control directly from the Node-RED editor while testing automations.
Adding Scheduled Control with Cron Plus
The next step was giving the Executor its own daily schedule.
I’m using the Node-RED cronplus node because it supports both conventional cron expressions and solar events.
That means the model can react to real sunrise and sunset times rather than using a fixed morning time throughout the year.
Executor ON at Sunrise
The first Cron Plus node uses the solar event:
sunrise
The message sent by the node is:
Topic:
executor/led/set

Payload:
ON
The configured location allows Cron Plus to calculate the local sunrise time automatically.
The result is that the Executor lighting switches on each morning without having to continually adjust a fixed timer as daylight hours change through the year.
Executor OFF at 23:10
The shutdown schedule uses a normal cron expression:
0 10 23 * * *
Cron Plus uses a seconds field, so this means:
23:10:00 every day
The output is:
Topic:
executor/led/set

Payload:
OFF
Node-RED therefore sends the OFF command at 23:10 and the Python controller takes care of actually switching GPIO4 low.
An Important Node-RED MQTT Detail
One issue I encountered while creating the cron nodes was the MQTT topic.
My MQTT Out node doesn’t have a topic permanently configured inside the node itself.
Instead, it expects:
msg.topic
from whatever node feeds it.
Originally, the sunrise scheduler was outputting:
msg.topic = sunrise
and the night scheduler was using:
msg.topic = topic1
The payloads were correct, but those messages would never reach the Executor controller because it only listens to:
executor/led/set
The fix was to configure every relevant Node-RED node to output:
msg.topic = executor/led/set
This is worth watching for when reusing MQTT Out nodes across different automations.
Current Executor Schedule
The finished automated behaviour is currently:
Sunrise
   ↓
ON

During the day
   ↓
Manual ON / LOW / BREATHE as required

23:10
   ↓
OFF
Because the Python controller maintains the lighting state, Node-RED only needs to send a command when something actually changes.
There is no constant polling or repeated GPIO activity.
Future Automation Ideas
Now that the MQTT architecture is in place, adding more behaviour is easy.
For example I could add:
Sunrise → ON
Sunset → BREATHE
23:10 → OFF
Another possibility would be integrating it with Home Assistant presence information so that the display only operates when someone is home.
Because Node-RED and the Raspberry Pi communicate through MQTT, these changes wouldn’t require modifying the GPIO control code at all.
Why I Prefer This Architecture
This project is another example of why I’ve been gradually moving my Raspberry Pi projects towards MQTT-controlled services.
Instead of this:
Node-RED
 ├── Run ledOn.py
 ├── Stop ledOn.py
 ├── Run ledBreathing.py
 └── Run ledOff.py
I now have:
Node-RED
      |
      v
     MQTT
      |
      v
Permanent Python Controller
      |
      v
     GPIO
The Raspberry Pi owns the hardware.
MQTT provides the interface.
Node-RED provides the automation.
Each part has one clear job.
It is easier to troubleshoot, easier to expand and far less likely to end up with multiple scripts fighting over the same GPIO pin.
For a relatively simple lighting project, it also gives the Executor the same basic control architecture that I can reuse across my other Raspberry Pi and smart-model projects.
Final Result
The Executor now has a permanent Raspberry Pi lighting controller providing:
ON
OFF
LOW
BREATHE
over MQTT.
The Python process automatically starts after reboot through systemd, while Node-RED handles manual controls and daily scheduling.
The hardware configuration remains simple:
Raspberry Pi
GPIO4 / physical pin 7
1 kHz PWM
Active-high LED circuit
while the software side is now considerably cleaner and more flexible.
What began as three small standalone Python scripts has effectively become a reusable MQTT-controlled lighting platform — and one that can easily be integrated into the wider Realm Labs automation environment.