

Changing a Windows account picture on one computer is simple.
Changing it reliably for multiple domain users, across multiple domain-joined computers, while retaining central control is a slightly different problem.
I wanted a system where profile pictures could be administered from a simple internal web page rather than editing PowerShell scripts or manually touching each PC.
The final solution combines several fairly ordinary technologies:
- Active Directory
- SYSVOL
- Group Policy
- PowerShell
- Windows Scheduled Tasks
- JSON
- LDAP over TLS
- Docker
- Node.js
The result is a small domain-management application where I can upload an image, assign it to a domain user and allow the clients to update themselves automatically.
No manual editing of the deployment script is required when a user picture changes, and normal picture changes do not require gpupdate /force.
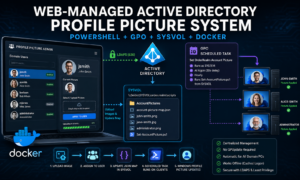
The finished architecture
The system is split into three parts.
The web application handles administration.
SYSVOL stores the authoritative images, JSON mapping and PowerShell deployment script.
Each Windows computer has a Group Policy-deployed Scheduled Task that periodically runs the PowerShell script as SYSTEM.
The overall flow looks like this:
Web Admin
    │
    ├── LDAP/LDAPS ───────► Active Directory
    │                       Reads domain users
    │
    └── Writes ───────────► SYSVOL
                            │
                            ├── AccountPictures\
                            │     ├── user1.png
                            │     ├── user2.jpg
                            │     └── account-picture-map.json
                            │
                            └── Set-AccountPicture.ps1
                                      │
                                      ▼
                              GPO Scheduled Task
                                      │
                                      ▼
                                Windows Client
                                      │
                                      ├── Detect logged-on user
                                      ├── Read JSON mapping
                                      ├── Generate Windows image sizes
                                      └── Update account picture registry
In my environment the relevant SYSVOL paths are:
\\Seido\SYSVOL\order.realm\scripts\Set-AccountPicture.ps1and:
\\Seido\SYSVOL\order.realm\scripts\AccountPicturesThe same principle will work with a conventional Windows Server domain controller or another Samba-compatible Active Directory implementation.
Why not just use a normal GPO?
Windows does not provide a particularly elegant built-in Group Policy setting for assigning a different account picture to each domain user.
There are also several complications.
The Windows account picture is stored in multiple resolutions.
The registry entries are associated with the user’s SID rather than simply their username.
The script needs administrative access to write the relevant machine-level registry location.
And if a computer is shared by several users, the script needs to work out who is actually signed in while itself running as SYSTEM.
A Scheduled Task turned out to be a convenient way of dealing with all of those requirements.
The SYSVOL structure
I created an AccountPictures directory below the existing domain scripts directory.
The final structure is similar to:
SYSVOL
└── order.realm
    └── scripts
        ├── Set-AccountPicture.ps1
        │
        └── AccountPictures
            ├── account-picture-map.json
            ├── john-smith.png
            ├── jane-smith.jpg
            └── administrator.png
SYSVOL is useful here because domain computers already have access to it.
The Windows clients therefore don’t need another network share or set of credentials simply to retrieve the images.
Moving the mappings out of PowerShell
The first version of the deployment script contained mappings directly in PowerShell.
That worked, but it meant that changing an image also meant editing code.
A better solution was to move the configuration into JSON.
For example:
{
  "default": null,
  "users": {
    "jsmith": "john-smith.png",
    "asmith": "jane-smith.jpg",
    "administrator": "administrator.png"
  },
  "updated": "2026-08-30T18:02:32.192Z"
}
The username is stored in lowercase and the value is simply the source image filename.
The deployment script remains generic.
That separation is important because the web application only needs to modify the JSON file. It never needs to rewrite the PowerShell deployment logic.
The PowerShell deployment script
The script runs as NT AUTHORITY\SYSTEM.
Its job is to:
- identify the currently logged-on Windows user;
- look up that user in the JSON mapping;
- locate the corresponding source image in SYSVOL;
- resolve the user’s SID;
- generate all of the Windows account-picture sizes;
- create the registry entries used by Windows.
A simplified version of the core logic looks like this:
$LogFolder = "C:\ProgramData\OrderRealm"
$LogFile = "$LogFolder\SetAccountPicture.log"

$PicturesRoot = "\\Seido\SYSVOL\order.realm\scripts\AccountPictures"
$MapPath = Join-Path $PicturesRoot "account-picture-map.json"

New-Item -Path $LogFolder -ItemType Directory -Force | Out-Null

try {

    "----- $(Get-Date) -----" |
        Out-File $LogFile -Append

    "Running as: $(
        [System.Security.Principal.WindowsIdentity]::GetCurrent().Name
    )" |
        Out-File $LogFile -Append


    $LoggedOnUser = $null

    for ($i = 0; $i -lt 12; $i++) {

        $Explorer =
            Get-CimInstance Win32_Process `
                -Filter "Name='explorer.exe'" |
            Select-Object -First 1

        if ($Explorer) {

            $Owner =
                Invoke-CimMethod `
                    -InputObject $Explorer `
                    -MethodName GetOwner

            if ($Owner.User) {

                $LoggedOnUser =
                    "$($Owner.Domain)\$($Owner.User)"

                break
            }
        }

        Start-Sleep -Seconds 5
    }


    if (-not $LoggedOnUser) {
        throw "No interactive logged-on user found after 60 seconds."
    }


    "Logged-on user: $LoggedOnUser" |
        Out-File $LogFile -Append


    $Domain, $Username =
        $LoggedOnUser -split "\\", 2

    $UsernameKey =
        $Username.ToLowerInvariant()


    $Map =
        Get-Content $MapPath -Raw |
        ConvertFrom-Json


    $PictureFile = $null


    if (
        $Map.users -and
        $Map.users.PSObject.Properties.Name -contains $UsernameKey
    ) {

        $PictureFile =
            $Map.users.$UsernameKey

    }
    elseif ($Map.default) {

        $PictureFile =
            $Map.default

    }


    if (-not $PictureFile) {
        throw "No account picture configured for user: $Username"
    }


    "Picture selected: $PictureFile" |
        Out-File $LogFile -Append


    $Source =
        Join-Path $PicturesRoot $PictureFile


    if (!(Test-Path $Source)) {
        throw "Source image not found: $Source"
    }


    $Account =
        New-Object System.Security.Principal.NTAccount(
            $LoggedOnUser
        )


    $SID =
        $Account.Translate(
            [System.Security.Principal.SecurityIdentifier]
        ).Value


    "SID: $SID" |
        Out-File $LogFile -Append


    $DestFolder =
        "C:\Users\Public\AccountPictures\$SID"


    New-Item `
        -Path $DestFolder `
        -ItemType Directory `
        -Force |
        Out-Null


    Add-Type -AssemblyName System.Drawing


    $SourceImage =
        [System.Drawing.Image]::FromFile(
            $Source
        )


    $Sizes =
        32,
        40,
        48,
        64,
        96,
        192,
        208,
        240,
        424,
        448,
        1080


    $RegPath =
        "HKLM:\SOFTWARE\Microsoft\Windows\CurrentVersion\AccountPicture\Users\$SID"


    New-Item `
        -Path $RegPath `
        -Force |
        Out-Null


    foreach ($Size in $Sizes) {

        $Dest =
            Join-Path `
                $DestFolder `
                "Image$Size.jpg"


        $Bitmap =
            New-Object System.Drawing.Bitmap(
                $Size,
                $Size
            )


        $Graphics =
            [System.Drawing.Graphics]::FromImage(
                $Bitmap
            )


        $Graphics.InterpolationMode =
            [System.Drawing.Drawing2D.InterpolationMode]::HighQualityBicubic


        $Graphics.DrawImage(
            $SourceImage,
            0,
            0,
            $Size,
            $Size
        )


        $Bitmap.Save(
            $Dest,
            [System.Drawing.Imaging.ImageFormat]::Jpeg
        )


        $Graphics.Dispose()
        $Bitmap.Dispose()


        New-ItemProperty `
            -Path $RegPath `
            -Name "Image$Size" `
            -Value $Dest `
            -PropertyType String `
            -Force |
            Out-Null
    }


    $SourceImage.Dispose()


    "Account picture images generated successfully." |
        Out-File $LogFile -Append


    "SUCCESS" |
        Out-File $LogFile -Append


    exit 0
}
catch {

    "ERROR: $($_.Exception.Message)" |
        Out-File $LogFile -Append

    exit 10
}
Detecting the interactive user
One of the more interesting parts of the script is determining which user is actually logged in.
Because the Scheduled Task runs as SYSTEM, simply asking PowerShell for the current identity gives:
NT AUTHORITY\SYSTEMThat isn’t useful.
Instead, the script finds explorer.exe and asks Windows who owns that process.
For a normal desktop session, Explorer belongs to the interactive user.
The script retries for up to 60 seconds because Explorer may not yet exist when a task runs immediately after logon.
That makes the deployment considerably more reliable during startup.
Generating the Windows account picture sizes
Windows doesn’t just use a single avatar file.
The profile picture directory contains several sizes:
Image32.jpg
Image40.jpg
Image48.jpg
Image64.jpg
Image96.jpg
Image192.jpg
Image208.jpg
Image240.jpg
Image424.jpg
Image448.jpg
Image1080.jpg
These are created beneath:
C:\Users\Public\AccountPictures\<USER-SID>The PowerShell script uses System.Drawing to resize the original PNG or JPEG and creates all of the required files.
It then creates matching values beneath:
HKLM\SOFTWARE\Microsoft\Windows\CurrentVersion\AccountPicture\Users\<SID>For example:
Image32
Image40
Image48
Image64
...
Image1080
Each registry value points to the corresponding generated JPEG.
Deploying the script with Group Policy
I created a dedicated computer GPO for the task.
In Group Policy Management:
Computer Configuration
└── Preferences
    └── Control Panel Settings
        └── Scheduled Tasks
The task runs:
powershell.exewith:
-ExecutionPolicy Bypass -File "\\Seido\SYSVOL\order.realm\scripts\Set-AccountPicture.ps1"The task runs as:
NT AUTHORITY\SYSTEMwith highest privileges.
The primary trigger is:
At logon
Any user
30 second delay
I also added a second trigger that runs periodically.
Mine repeats once per hour.
This gives the system a useful self-healing property.
If the network isn’t available during logon, or a picture is changed later, the next scheduled run simply tries again.
Why I didn’t force synchronous domain logons
One option would have been enabling the Group Policy setting that forces Windows to wait for the network before completing startup and logon.
I decided against that.
For laptops and occasionally disconnected machines, I would rather allow Windows to log in normally using cached domain credentials.
The scheduled task can catch up later when the domain controller becomes available.
That gives me central management without making successful domain connectivity a hard dependency for every login.
The web admin application
Once the PowerShell side was working, the next step was removing the need to manually edit JSON.
I already had Docker running on the server, so I created a small Node.js application.
The application provides:
- domain user enumeration;
- current profile picture preview;
- image selection;
- image upload;
- user-to-picture assignment;
- automatic JSON updates.
The service runs internally on:
http://server:3022The browser displays the users read directly from Active Directory rather than maintaining a second user database.
Reading Active Directory with LDAPS
The Node.js application uses ldapts.
The connection is made over:
ldaps://domain-controller:636The application uses a dedicated LDAP bind account and a trusted copy of the domain CA certificate.
The LDAP query looks for user objects with a sAMAccountName while excluding computer objects.
Conceptually:
(&(objectClass=user)
  (!(objectClass=computer))
  (sAMAccountName=*))
The returned fields include:
sAMAccountName
displayName
cn
userAccountControl
This also allows the UI to indicate whether an account is disabled.
Keeping credentials out of the container image
The LDAP password is not stored in server.js, the Dockerfile or the Compose file.
Instead, the container receives a read-only password file:
/run/secrets/ldap_passwordThe application’s configuration points to that file.
The CA certificate is also mounted read-only.
This keeps the application image reusable and avoids baking credentials into it.
Mounting SYSVOL into Docker
The Docker container needs access to the same directory that Windows clients see through SYSVOL.
On the Synology host, the relevant directory is beneath Directory Server’s internal SYSVOL location.
It is mounted into the container as:
/app/picturesThe application then uses:
PICTURES_DIR=/app/picturesand:
MAP_FILE=/app/pictures/account-picture-map.jsonThe important part is that this is the actual live SYSVOL directory.
Uploading a file through the web application therefore makes it immediately available to domain clients.
There is no secondary synchronisation process.
Uploading images
The web application accepts:
.png
.jpg
.jpeg
Uploaded filenames are sanitised before being stored.
For example, characters that are awkward in filenames can be replaced while retaining the valid image extension.
Multer handles the multipart upload and writes the file directly into the mounted AccountPictures directory.
I also added a segmented progress indicator to the interface showing the upload percentage.
It doesn’t change the functionality, but it makes the admin page feel considerably more complete.
Assigning a picture
Selecting an image for a user and clicking Apply sends a small request to the Node.js backend.
The backend updates:
account-picture-map.jsonFor example:
{
  "default": null,
  "users": {
    "jsmith": "john-smith.png",
    "asmith": "jane-smith.png"
  },
  "updated": "2026-08-30T19:11:37.000Z"
}
The timestamp is also updated each time the mapping changes.
The next time the client Scheduled Task runs, the PowerShell script reads that JSON and applies the new image.
No gpupdate required for normal changes
This was one of the nicest consequences of separating policy from configuration.
Changing a profile picture does not modify the GPO.
The GPO simply created the Scheduled Task.
That task already points to:
\\domain\SYSVOL\...\Set-AccountPicture.ps1and the script reads the live JSON file each time it runs.
Therefore:
Upload image
→ Assign image
→ JSON changes
→ Scheduled Task runs
→ new picture is applied
There is no reason to run:
gpupdate /forcewhen simply changing a picture.
A Group Policy refresh is only relevant if the policy itself changes, such as modifying the Scheduled Task configuration or changing which computers receive it.
For testing, the task can be started manually:
Start-ScheduledTask `
    -TaskName "Set OrderRealm Account Picture"
Logging and troubleshooting
The client script writes to:
C:\ProgramData\OrderRealm\SetAccountPicture.logA successful run looks similar to:
----- 08/30/2026 19:11:37 -----
Running as: NT AUTHORITY\SYSTEM
Logged-on user: DOMAIN\jsmith
Picture selected: john-smith.png
SID: S-1-5-21-...
Account picture images generated successfully.
SUCCESS
The last few entries can be viewed with:
Get-Content `
    "C:\ProgramData\OrderRealm\SetAccountPicture.log" `
    -Tail 20
The Scheduled Task itself can be inspected with:
Get-ScheduledTask `
    -TaskName "Set OrderRealm Account Picture"
and:
Get-ScheduledTaskInfo `
    -TaskName "Set OrderRealm Account Picture" |
Select-Object `
    LastRunTime,
    LastTaskResult
A LastTaskResult of 0 indicates success.
Confirming the generated files
The account-picture files can also be inspected directly.
For the currently logged-in user:
$SID =
    (
        [System.Security.Principal.WindowsIdentity]::GetCurrent()
    ).User.Value

Get-ChildItem `
    "C:\Users\Public\AccountPictures\$SID"
After a successful update, all of the Image*.jpg files should have a recent timestamp.
Windows can occasionally retain the previous image in its shell cache, so signing out and back in may be required before every part of the UI reflects the new avatar.
A useful Docker lesson
One issue I hit while developing the web application had nothing to do with Active Directory.
I rebuilt the Docker image and then ran:
docker restart profile-picture-adminThe updated files didn’t appear.
The reason is simple: restarting a container does not recreate it from the newly built image.
The existing container continues using the filesystem from the image it was originally created from.
After rebuilding:
docker build -t profile-picture-admin:latest .the container needs to be recreated:
docker rm -f profile-picture-admin

docker compose up -d
or redeployed through the container-management interface.
This was particularly noticeable while updating the web UI.
A quick way of proving which version is actually inside the running container is:
docker exec profile-picture-admin \
    grep -n "some known text" \
    /app/public/index.html
That saved quite a bit of head-scratching.
Another useful lesson: know which copy you’re editing
A related development mistake was editing a copy of the application stored elsewhere on the NAS while Docker was building from:
/volume1/docker/profile-picture-adminThe source looked correct in my editor, but the build context still contained the older HTML.
Checking the actual build source with:
grep -n \
    "Uploading to SYSVOL" \
    /volume1/docker/profile-picture-admin/public/index.html
made the problem obvious.
It’s a small detail, but one that’s easy to miss when the same project exists in several directories.
Security considerations
This is an internal administration application, but there are still a few sensible precautions.
The LDAP bind account should have only the permissions required to read the directory.
Credentials should not be stored directly in source code.
LDAPS should be used instead of unencrypted LDAP.
The profile-picture directory should not be exposed more widely than necessary.
The application should ideally only be accessible from a trusted management network.
And the upload endpoint should continue validating both file types and filenames.
The Windows deployment side runs as SYSTEM, so the PowerShell script itself should remain in a location that ordinary domain users cannot modify.
That last point is particularly important.
If users can alter a script that every workstation subsequently executes as SYSTEM, the profile-picture system has become a privilege-escalation system.
Possible future improvements
The current system already does what I originally wanted, but there are several logical extensions.
The web interface could show the last time each client successfully applied a profile picture.
Old, unused source images could be detected automatically.
Uploads could generate thumbnails server-side.
A default organisation-wide avatar could be assigned when no explicit user mapping exists.
The application could also support drag-and-drop uploads or allow an administrator to crop images before saving them.
At that point, though, this starts becoming less of a profile-picture script and more of a lightweight domain identity-management application.
Which is probably how these projects always go.
Final result
The finished setup gives me a central web interface for something Windows doesn’t make particularly pleasant to administer natively.
An administrator can now:
Open Profile Picture Admin
→ select a domain user
→ upload or choose an image
→ click Apply
The web service updates the JSON mapping in SYSVOL.
The client’s existing Scheduled Task reads that configuration on its next run.
PowerShell generates the native Windows image sizes and registry entries.
And the new profile picture appears without touching the GPO.
It’s a slightly over-engineered answer to a very small problem.
Which makes it exactly the sort of project I enjoy building.