

MQTT is one of those services that quietly becomes more important the longer you use it.
At first, I was only using it for a few simple messages.
Then more things started depending on it.
The Raspberry Pi used it.
Node-RED used it.
Home Assistant used it.
The TARDIS used it.
ESP32 devices used it.
Eventually, changing the MQTT broker address stopped being a simple infrastructure tweak and became a small migration project.
That happened in Realm Labs when I moved the broker to my Synology DS224+.
The broker itself was easy to move.
The difficult part was finding everything that still pointed at the old IP address.
The Old MQTT Setup
The original MQTT broker had been running elsewhere on the network.
Over time, different devices and applications had been configured to connect to that same address.
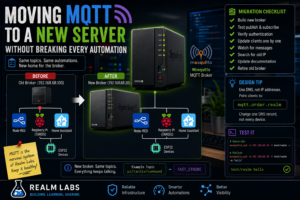
The architecture looked roughly like:
                   MQTT Broker
                   Old IP Address
                         |
          +--------------+--------------+
          |              |              |
          v              v              v
      Node-RED      Raspberry Pi    Home Assistant
          |
          v
        ESP32
Everything worked.
Which meant I rarely had to think about the broker itself.
Then the Broker Moved
As the Synology DS224+ became more central to Realm Labs, it made sense to run Mosquitto there.
The new address became:
192.168.68.20
So the target architecture became:
                 Synology DS224+
                  192.168.68.20
                         |
                    Mosquitto
                         |
          +--------------+--------------+
          |              |              |
          v              v              v
      Node-RED      Raspberry Pi    Home Assistant
The new broker worked perfectly.
Unfortunately, several clients were still trying to talk to the old one.
The Problem with Hard-Coded IP Addresses
This is where the migration became interesting.
MQTT clients are often configured with something as simple as:
192.168.68.100
or:
BROKER = "192.168.68.100"
or inside Node-RED:
Server:
192.168.68.100
Port:
1883
That is easy to configure.
It is also easy to forget.
The migration problem became:
Broker moved
    |
    v
New broker works
    |
    v
Some clients still use old IP
    |
    v
Automations fail
MQTT Failures Can Be Surprisingly Quiet
One reason this is easy to miss is that not every MQTT-dependent application fails dramatically.
Some simply keep retrying.
Node-RED may show:
disconnected
A Python script might repeatedly reconnect.
An ESP32 may simply stop responding to commands.
Home Assistant entities may become unavailable.
The overall effect can look like several unrelated automation failures at the same time.
The First Test: Is the New Broker Actually Working?
Before changing every client, I needed to prove the new Mosquitto instance itself worked.
On a machine with the Mosquitto client utilities installed:
mosquitto_sub \
  -h 192.168.68.20 \
  -t test/realm \
  -v
Then from another terminal:
mosquitto_pub \
  -h 192.168.68.20 \
  -t test/realm \
  -m "hello"
The subscriber should show:
test/realm hello
At that point:
Broker is running
Port 1883 works
Network path works
Publish works
Subscribe works
That is the baseline.
Check Port 1883
If the test fails, first check whether Mosquitto is actually listening.
On the broker:
sudo ss -tulpn | grep :1883
or:
sudo netstat -tulpn | grep :1883
I want to see something listening on:
1883
for normal MQTT.
If authentication or TLS is configured, there may be additional ports, but 1883 was the important one in my setup.
Moving the Raspberry Pi Clients
Several Raspberry Pi scripts had the broker address embedded directly in Python.
For example:
BROKER = "192.168.68.100"
That needed to become:
BROKER = "192.168.68.20"
This affected things such as the TARDIS Pi agent.
Its command topic remained:
pi/tardis/command
and its status topic remained:
pi/tardis/status
Only the broker changed.
That’s exactly how I wanted the migration to work.
Keep the Topics the Same
This is probably the most important design choice during a broker migration.
I didn’t want to change:
Broker
+
Topics
+
Payloads
all at once.
I only wanted to change:
Broker address
So:
pi/tardis/command
stayed:
pi/tardis/command
and:
LIGHT_ON
still meant:
LIGHT_ON
That meant all of the automation logic remained compatible.
Updating Node-RED
Node-RED has its own MQTT broker configuration.
An MQTT In or MQTT Out node usually points to a shared broker configuration.
That is useful because changing the broker once can update many flows.
Instead of editing every MQTT node:
Flow 1
Flow 2
Flow 3
Flow 4
I could change the shared broker from:
192.168.68.100
to:
192.168.68.20
Then deploy the flows.
That is much cleaner.
Watch the MQTT Node Status
Node-RED conveniently displays MQTT connection state underneath the nodes.
A healthy connection should show something like:
connected
If it remains:
disconnected
or:
connecting
then something is still wrong.
This is one of the fastest ways to confirm the migration.
Updating Home Assistant
Home Assistant also needed to point at the new broker.
Depending on the setup, MQTT may be configured through the UI or YAML.
The important values are:
Broker host
Port
Username
Password
Only the host needed changing.
Afterwards, existing MQTT devices and entities could continue using the same topics.
Again:
Same messages
Same topics
Different broker
Updating the ESP32
The ESP32-C3 controlling part of the TARDIS also depended on MQTT.
Its firmware contained broker details.
Conceptually:
const char* mqtt_server = "192.168.68.100";
which needed to become:
const char* mqtt_server = "192.168.68.20";
After recompiling and flashing, the ESP32 could reconnect to the new broker.
Its existing topic:
esp32c3/led/set
didn’t need to change.
This Exposed Every Hidden Dependency
The broker migration became an unexpectedly good audit of the automation environment.
Anything that stopped working was effectively telling me:
I still know about the old broker.
That included:
- Python scripts
- Node-RED
- Home Assistant
- ESP32 firmware
- Test scripts
- MQTT utilities
- Possibly old documentation
It was annoying.
But useful.
Search the Filesystem for the Old Address
Rather than relying entirely on memory, I could search configuration and project files.
On Linux:
grep -R "192.168.68.100" /home/pi 2>/dev/null
or across a project directory:
grep -R "192.168.68.100" /opt/projects
That can quickly reveal forgotten references.
This became especially useful after the Synology itself changed address.
Search Node-RED Exports
If I export Node-RED flows as JSON, I can also search them:
grep -n "192.168.68.100" flows.json
Usually the broker configuration is shared, but exports are a useful sanity check.
Use MQTT Explorer or a Subscriber During Migration
A very effective way to monitor the migration is to subscribe broadly.
For example:
mosquitto_sub \
  -h 192.168.68.20 \
  -t '#' \
  -v
The wildcard:
#
subscribes to all topics the account is permitted to see.
That means as devices reconnect, I can watch messages appearing.
For example:
pi/tardis/status online

home/pi/cpu 14.2

esp32c3/status online
It’s a satisfying way to see the system come back to life.
Be Careful with # on Busy Brokers
On a small home broker, subscribing to everything is useful.
On a large MQTT environment, that can produce an enormous amount of traffic.
So I only use it as a temporary diagnostic tool.
Retained Messages Help
Retained MQTT messages were useful during the move.
For example, a device can publish:
online
to its status topic with:
retain = true
Then when Home Assistant or Node-RED reconnects to the new broker, the latest state is immediately available.
That means the dashboards don’t have to wait for every device to publish again.
But Retained Messages Don’t Move Automatically
This is an important point.
When moving to a completely new broker:
Old broker retained messages
do not automatically appear on:
New broker
unless you deliberately migrate them.
For my setup, that wasn’t a big problem because devices quickly republished their state.
But it’s something to remember.
MQTT Last Will Makes Migration Visible
Many of my later MQTT clients use Last Will and Testament.
That means a client can tell the broker:
If I disappear unexpectedly,
publish "offline".
When the client reconnects to the new broker, it can publish:
online
This makes migration status much clearer in Home Assistant.
Authentication
If the old and new brokers use authentication, client credentials need to be checked too.
The client configuration might include:
Host
Port
Username
Password
If the host is correct but the credentials aren’t present on the new broker, the symptoms change from:
Connection refused / timeout
to something more like:
Not authorised
That’s an important distinction.
Test with Credentials
For example:
mosquitto_sub \
  -h 192.168.68.20 \
  -p 1883 \
  -u username \
  -P password \
  -t test/realm
If that works, the authentication side is fine.
DNS Would Have Made This Easier
The migration taught me another lesson.
Instead of putting:
192.168.68.20
into every application, it would be cleaner to use something like:
mqtt.order.realm
Then the clients could connect to:
mqtt.order.realm
and DNS could decide where the broker actually lived.
The next migration would then become:
Update DNS
instead of:
Update every MQTT client
That is a much more scalable design.
Service Names Are Better Than Server Names
I would actually prefer:
mqtt.order.realm
over:
seido.order.realm
for the MQTT clients.
Why?
Because the application cares about:
MQTT service
not:
Which machine currently hosts MQTT
That separation makes infrastructure much easier to change.
The Ideal Design
Instead of:
Pi
  |
  v
192.168.68.20
use:
Pi
  |
  v
mqtt.order.realm
  |
  v
DNS
  |
  v
192.168.68.20
If Mosquitto moves again later:
mqtt.order.realm
stays the same.
Only DNS changes.
Don’t Remove the Old Broker Immediately
If possible, keeping the old broker running temporarily can make migration easier.
The process becomes:
Old broker running
        |
        v
Bring up new broker
        |
        v
Move clients one at a time
        |
        v
Verify each client
        |
        v
Retire old broker
That’s much safer than:
Turn off old broker
        |
        v
Everything breaks
        |
        v
Start investigating
In my case, having a controlled migration made it much easier to identify the remaining dependencies.
A Broker Bridge Is Another Option
Mosquitto can also bridge brokers.
That can be useful for more complex migrations:
Old Broker
    |
    v
Bridge
    |
    v
New Broker
Messages can be forwarded while clients are gradually moved.
For Realm Labs, that would probably have been unnecessary complexity.
But it’s useful to know the option exists.
Test Each Client Separately
I found it much easier to migrate the system in layers.
Broker
Can I publish and subscribe?
Raspberry Pi
Does pi/tardis/status appear?
Node-RED
Do MQTT nodes show connected?
Home Assistant
Do MQTT entities update?
ESP32
Does esp32c3/led/set still work?
One device at a time.
Testing the TARDIS
The TARDIS was a particularly good end-to-end test.
From Node-RED, I could publish:
Topic:
pi/tardis/command

Payload:
FAST_STROBE
The path should be:
Node-RED
    |
    v
Synology Mosquitto
    |
    v
Raspberry Pi Agent
    |
    v
FastStrobe.py
    |
    v
TARDIS light
If the light reacted, a large part of the MQTT infrastructure was proven.
Then Test the ESP32
Similarly:
Topic:
esp32c3/led/set

Payload:
BREATHE
should result in the expected LED effect.
That verifies:
Node-RED
Broker
Wi-Fi
ESP32 MQTT client
Firmware
all at once.
Update Documentation While You Are There
This is the part I often forget.
Fixing the live system but leaving documentation with:
192.168.68.100
just means the old address will come back to haunt me later.
So the migration also included updating:
- Notes
- Scripts
- Compose files
- README files
- Diagrams
- Home Assistant documentation
A migration isn’t really finished until the old value stops appearing everywhere.
Search for the Old Address Again
Once everything looked healthy:
grep -R "192.168.68.100" /path/to/projects
again.
Anything still returned deserved inspection.
Some hits might be harmless historical notes.
Others might be live configuration waiting to break later.
Monitor the Broker
Uptime Kuma can monitor:
TCP 1883
on:
192.168.68.20
That doesn’t prove MQTT messages are flowing correctly, but it does tell me whether the broker is reachable.
For deeper monitoring, a periodic test publisher/subscriber would be better.
The Migration Checklist
If I were moving MQTT again, I’d use this process.
- Build the new broker.
- Confirm port 1883 is listening.
- Test publish and subscribe locally.
- Confirm authentication.
- Leave the old broker running if possible.
- Move Node-RED.
- Move Home Assistant.
- Move Raspberry Pi scripts.
- Move ESP32/embedded devices.
- Watch the new broker for messages.
- Search configuration for the old address.
- Update documentation.
- Shut down the old broker.
- Watch for anything that suddenly breaks.
That final step catches the things you forgot.
What I Would Do Differently Today
The biggest change would be using DNS from the beginning.
Instead of:
BROKER = "192.168.68.20"
I would use:
BROKER = "mqtt.order.realm"
Then the infrastructure could change underneath without changing every client.
The broker becomes a service rather than a physical address.
That’s a much cleaner design.
The Final Realm Labs MQTT Setup
The finished architecture became:
                   Synology DS224+
                    192.168.68.20
                           |
                           v
                        Mosquitto
                           |
          +----------------+----------------+
          |                |                |
          v                v                v
      Node-RED       Home Assistant     Pi Agent
                                           |
                                           v
                                        TARDIS

                           |
                           +-------------> ESP32-C3
One central broker connecting the different automation systems.
The Realm Labs Takeaway
Moving Mosquitto itself wasn’t difficult.
The difficult part was discovering how many things depended on it.
The migration looked like:
Move MQTT broker
but the real job was:
Find every client
Update every client
Test every topic
Verify every automation
The most useful lesson was not really about MQTT.
It was about infrastructure dependencies.
If a service becomes central enough, hard-coding its IP address everywhere eventually becomes technical debt.
The next version of this architecture should be:
Client
   |
   v
mqtt.order.realm
   |
   v
DNS
   |
   v
Wherever Mosquitto currently lives
Then the next MQTT migration might take one DNS change instead of an afternoon of hunting through Python scripts, Node-RED flows and ESP32 firmware.
That would be progress.