

Hyper-V is Microsoft’s native Type-1 hypervisor built directly into Windows. Whether you are building a local dev environment, testing new operating systems, or setting up dedicated homelab services, Hyper-V offers bare-metal virtualization performance without needing third-party hypervisors like VMware Workstation or VirtualBox.
This comprehensive guide covers how to enable Hyper-V on Windows, configure virtual switches for networking, and deploy both Windows and Linux virtual machines.
Prerequisites & System Requirements
Before enabling Hyper-V, verify that your host system meets the following requirements:
- Windows Edition: Windows 10/11 Pro, Enterprise, or Education (Windows Home does not support the native Hyper-V hypervisor role).
- Hardware Virtualization: Intel VT-x or AMD-V / SVM mode must be enabled in your computer’s BIOS/UEFI settings.
- CPU Support: 64-bit processor with Second Level Address Translation (SLAT).
- Memory: Minimum 4 GB RAM (8 GB to 16 GB+ strongly recommended).
Verification
To check if your system is ready, open Command Prompt and run:
DOS
systeminfo
At the bottom of the output, under Hyper-V Requirements, ensure all parameters display Yes.
Step 1: Enabling Hyper-V on Windows
Hyper-V can be enabled using either the Windows Graphical Interface (GUI) or PowerShell.
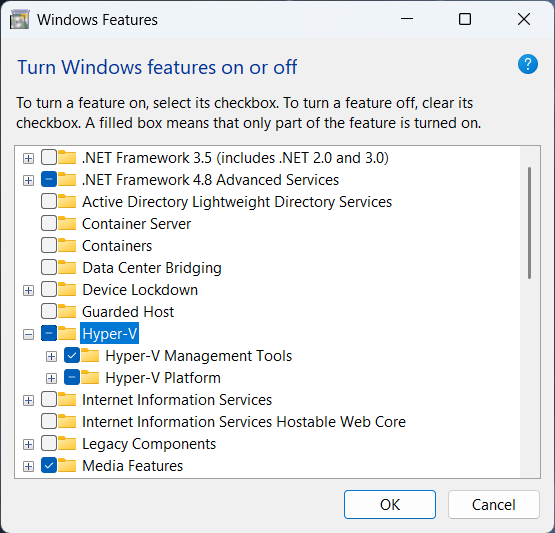
Option A: Via Windows Features (GUI)
- Press Win + R, type optionalfeatures, and press Enter.
- Scroll down to find Hyper-V.
- Check the box for Hyper-V (ensuring both Hyper-V Management Tools and Hyper-V Platform are selected).
- Click OK, wait for Windows to apply the changes, and click Restart now.
Option B: Via PowerShell (Fastest)
- Right-click the Start menu and select PowerShell (Admin) or Terminal (Admin).
- Run the following command:PowerShell
Enable-WindowsOptionalFeature -Online -FeatureName Microsoft-Hyper-V -All - Type Y when prompted to restart your computer.
Step 2: Setting Up Virtual Switches (Networking)
Hyper-V uses Virtual Switches to connect Virtual Machines (VMs) to networks. To manage or create virtual switches, launch Hyper-V Manager from your Start Menu and open Virtual Switch Manager from the right-hand Actions pane.
Understanding Virtual Switch Types
| Switch Type | Host Access | LAN / Internet Access | Other VMs Access | Typical Use Case |
| External | Yes | Yes | Yes | VMs that need Internet and home network IP addresses (DHCP from router). |
| Internal | Yes | No | Yes | Private testing labs where the host needs to communicate with VMs, but VMs are isolated from the router. |
| Private | No | No | Yes | Strictly isolated sandbox labs where VMs only speak to each other (no host access). |
How to Create an External Virtual Switch
To give your virtual machines access to the local network and the internet:
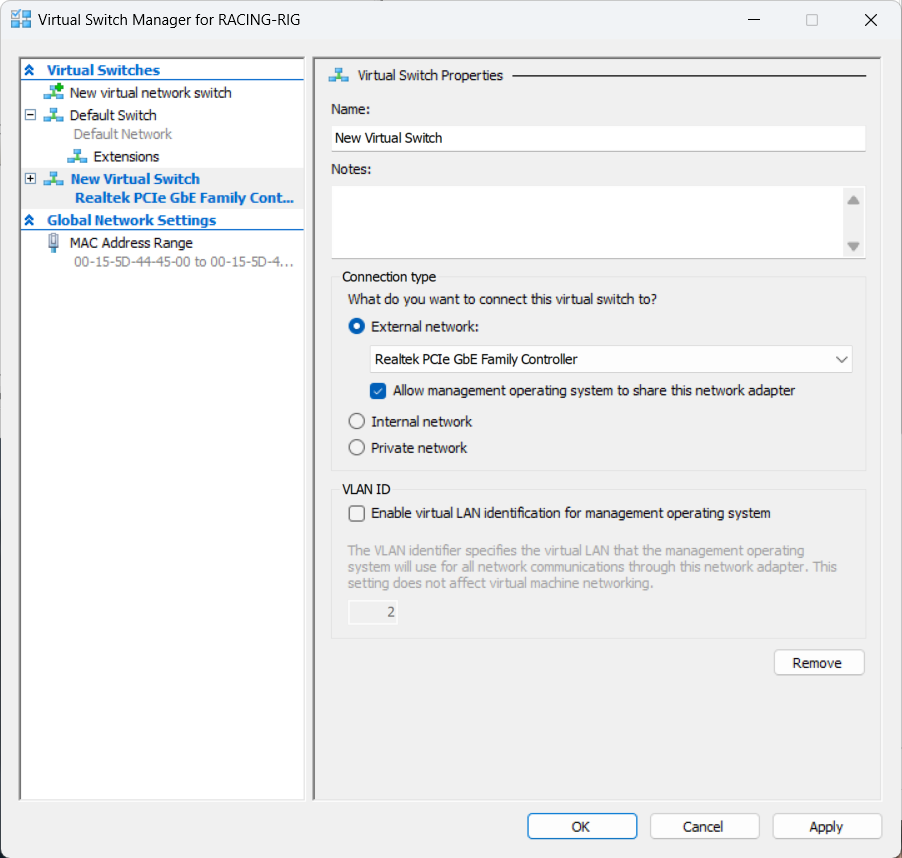
- In Hyper-V Manager, click Virtual Switch Manager… in the Actions panel.
- Select New virtual network switch on the left.
- Choose External and click Create Virtual Switch.
- Name the switch (e.g., External-Bridge).
- Under Connection type, select your physical network adapter (Ethernet or Wi-Fi).
- Ensure “Allow operating system to share this network adapter” is checked so your host computer retains internet access.
- Click Apply and OK.
Note: Your host network connection may briefly drop for a few seconds while the virtual bridge adapter is initialized.
Step 3: Creating & Installing a Windows Virtual Machine
Step 3.1: VM Creation Wizard
- In Hyper-V Manager, click New > Virtual Machine…
- Name and Location: Enter a name (e.g., Windows11-Lab) and optionally specify a storage path on your fast SSD/NVMe drive.
- Specify Generation: Select Generation 2 (Required for modern 64-bit OSs, UEFI, and Secure Boot).
- Assign Memory: Set Startup RAM to 4096 MB (4 GB). Check Use Dynamic Memory for this virtual machine.
- Configure Networking: Select your newly created External-Bridge switch.
- Connect Virtual Hard Disk: Select Create a virtual hard disk, set a name, and allocate a size (e.g., 64 GB dynamically expanding VHDX).
- Installation Options: Select Install an operating system from a bootable image file and browse to your downloaded Windows ISO file.
- Click Finish.
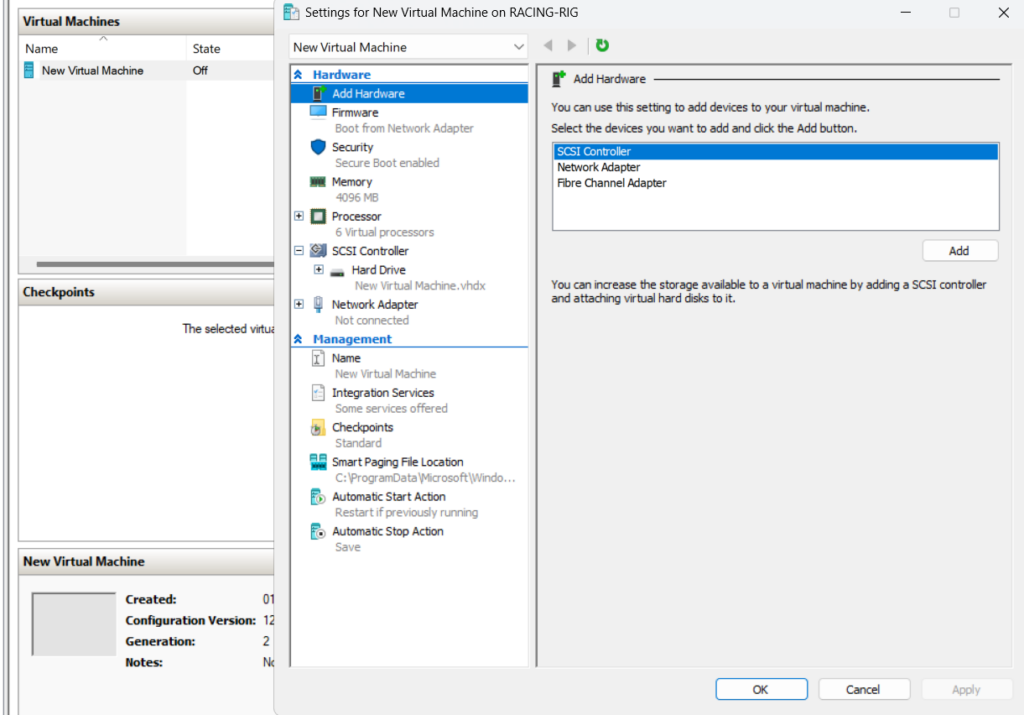
Once the virtual machine is created, you can adjust resources as needed.
Step 3.2: Enable TPM & Launch
If installing Windows 11, Trusted Platform Module (TPM) is required:
- Right-click the newly created VM and open Settings.
- Go to Security on the left menu.
- Check Enable Security Shield and Enable Trusted Platform Module.
- Click OK.
- Right-click the VM, click Connect, then click Start (Green power button).
- Press any key quickly when prompted to boot from CD/DVD and complete standard Windows setup.
Step 4: Creating & Installing a Linux Virtual Machine (Ubuntu)
Setting up Linux in Hyper-V is straightfoward, but requires a tweak to Secure Boot settings when using Generation 2 VMs.
Step 4.1: VM Setup
- Open New > Virtual Machine… in Hyper-V Manager.
- Name the VM (e.g., Ubuntu-24.04-Server).
- Select Generation 2.
- Allocate 2048 MB or 4096 MB RAM with Dynamic Memory enabled.
- Select External-Bridge under Network Connections.
- Create a VHDX virtual hard disk (e.g., 25 GB to 40 GB).
- Attach your downloaded Linux ISO (e.g., Ubuntu Desktop or Server ISO).
Step 4.2: Critical Security Setting for Linux
Before starting the VM:
- Open VM Settings… > Security.
- Under Secure Boot, either:
- Keep Secure Boot checked, but change the Template dropdown from Microsoft Windows to Microsoft UEFI Certificate Authority.
- Or, uncheck Enable Secure Boot entirely if your specific Linux distro lacks signed bootloaders.
- Under Processor, increase Virtual processors to at least 2 Cores.
- Click Apply and OK.
Step 4.3: OS Installation
- Click Connect and Start the virtual machine.
- Choose Try or Install Ubuntu from the GRUB menu.
- Follow the installation wizard prompts for language, storage partitioning, username, and password.
- Reboot the VM upon completion and unmount the ISO from the Virtual CD Drive under the Media menu top-bar.
Hyper-V Optimization & Best Practices
- Enhanced Session Mode: Ensure Enhanced Session Mode is enabled in Hyper-V Settings to enable clipboard sharing, drive redirection, and dynamic screen resizing for Windows VMs.
- Dynamic Memory Tuning: For production services or home lab nodes, set a fixed RAM minimum/maximum range in VM Settings to prevent one active VM from exhausting the physical host’s memory pool.
- Exclude VHDX Folders from Antivirus: Add your Hyper-V storage directory (where .vhdx files reside) to host Real-Time Antivirus exclusions to avoid continuous I/O overhead and performance degradation during disk reads/writes.